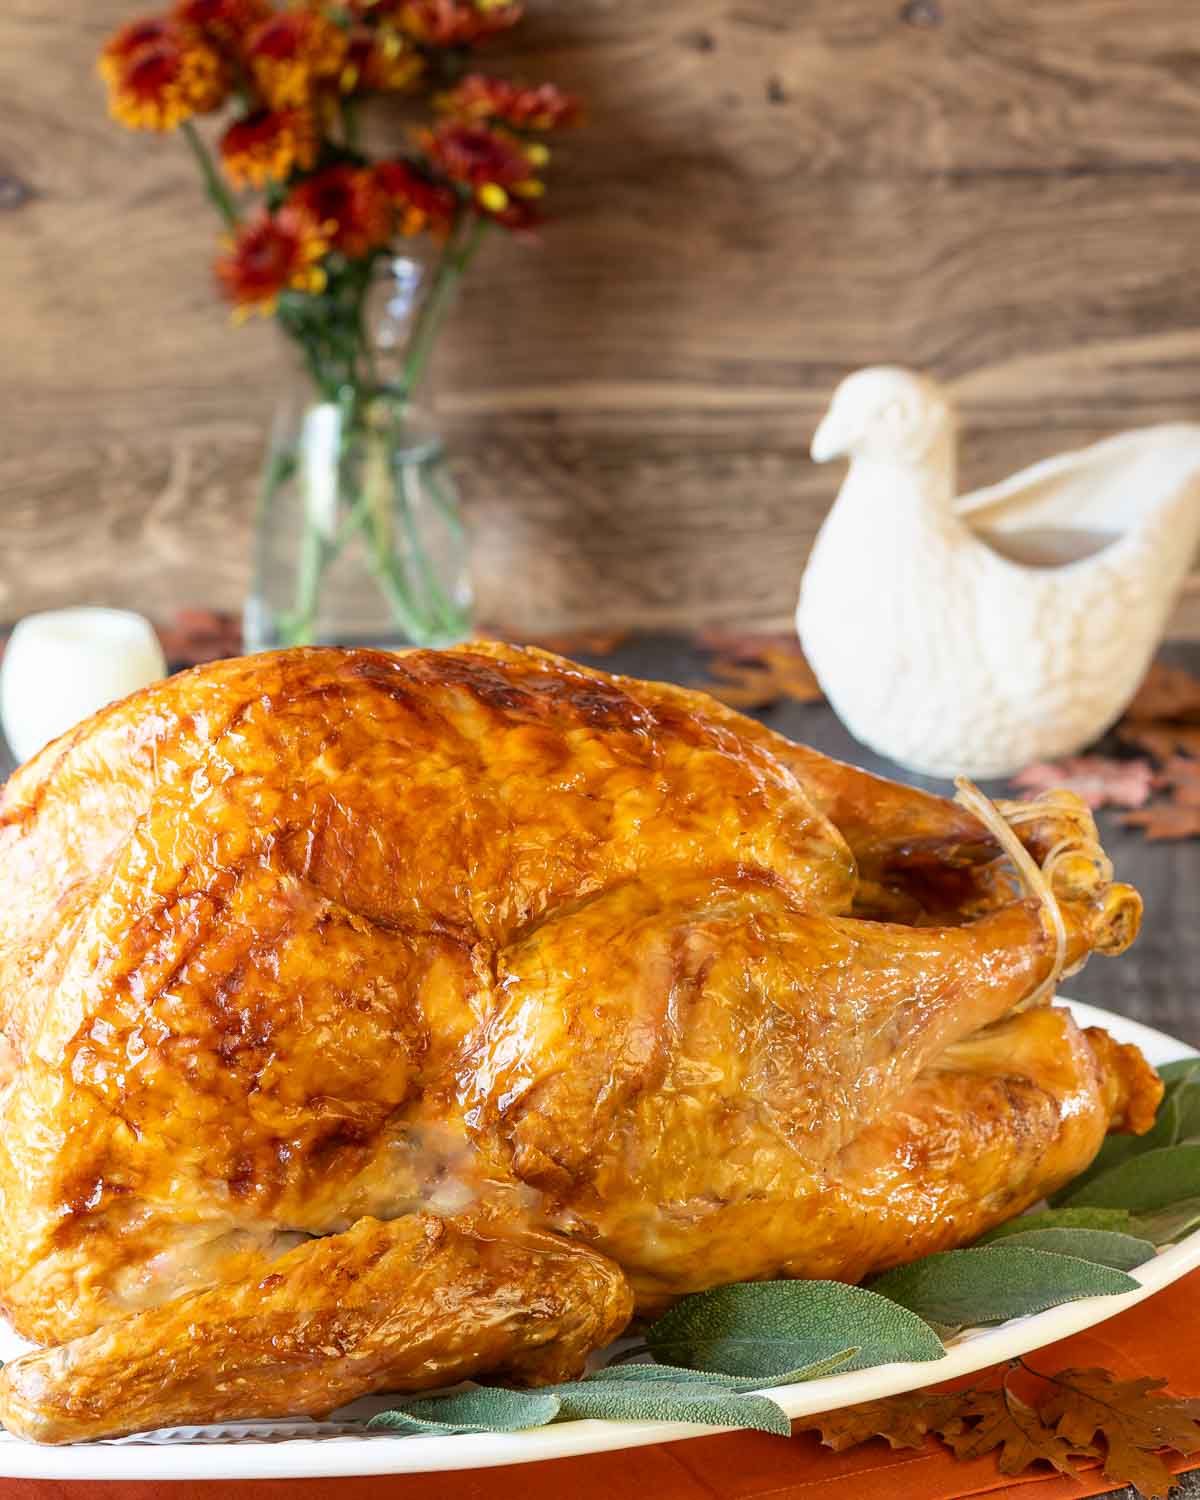
Do you feel overwhelmed when it comes to cooking the perfect roast turkey? Well, say goodbye to that anxiety because we have the ultimate solution for you: a step-by-step guide to achieving the perfect Oven Roasted Turkey. In this post, we’ll walk you through my mom’s time-tested process of creating a flavorful roast turkey that’s tender and moist on the inside, with beautifully golden-brown skin. And, no basting required! A Well-Seasoned Kitchen is all about empowering home cooks to create culinary masterpieces with ease, so we’ve created this detailed guide to ensure your success in the kitchen.

This post contains referral links for products I recommend. As an Amazon Associate, I earn a small commission on qualified purchases, at no cost to you.
Table of Contents
- What Makes This the Best Roasted Turkey Recipe
- Choosing the Right Turkey for Oven Roasting
- How to Thaw a Frozen Turkey
- Roasted Turkey Recipe Ingredients
- How to Brine a Turkey Before Roasting (Optional but Recommended)
- How to Roast a Turkey in the Oven
- Turkey Roasting Times by Weight
- Why Roast Turkey Breast-Side Down Initially?
- How to Make Pan Gravy
- How to Carve and Serve Oven Roasted Turkey
- Oven Roasted Turkey Recipe Variations
- What to Serve with Oven Roasted Turkey
- How to Store Oven Roast Turkey Leftovers
- Best Roasted Turkey Recipe
- Best Roast Turkey Recipe FAQs
What Makes This the Best Roasted Turkey Recipe
My mom was an accomplished cook and hostess, learning from her mother and perfecting her culinary techniques through years of entertaining. In fact, I frequently turn to her reliable recipes, especially her foolproof method for roasting a turkey. In this post, I’m excited to share with you all of her invaluable tips and tricks, along with a few of my own.
I’ll cover everything you need to know, from selecting, thawing, and prepping the bird, setting the right oven temperature, following timing guidelines, making the perfect gravy, and even carving and serving like a pro. Whether you’re a seasoned cook or this is your first time, this guide is your ticket to roasting a mouthwatering, juicy turkey that will leave your family and friends in awe. In the end, I’m sure you’ll agree with me that this is the Best Thanksgiving Turkey Recipe!
Choosing the Right Turkey for Oven Roasting
Before you can roast the perfect turkey, you need to start with the right bird. When choosing a turkey for oven roasting, there are a few factors to consider:
- Size. Consider the number of guests you’ll be serving. A general rule of thumb is to allow for 1 pound of turkey per person. However, if you want leftovers and/or have hearty eaters, you may want to plan for 1 1/2 to 2 pounds/person. Additionally, larger turkeys require longer cooking times – and larger roasting pans – so keep that in mind when planning your meal.
- Quality. Look for turkeys that are free-range or organic, as they tend to have better flavor and texture. In addition, natural or organic birds will be raised without antibiotics or artificial additives.
- USDA rating. The United States Department of Agriculture (USDA) grades turkeys as Grade A, B, or C based on their quality. Grade A is the highest quality and should have a plump, well-rounded shape.
- Fresh or Frozen. Fresh turkeys are often juicier but have a shorter shelf life, so plan to use them within a couple of days. Frozen turkeys are more convenient and can be stored for longer. Just make sure to allow time for thawing them in the refrigerator (24 hours for every 5 pounds of turkey). And, if you opt for a fresh turkey, check for moist skin, and a pleasant, clean smell. Avoid any turkey with a strong or off-putting odor.
- Packaging and handling. Ensure the turkey is properly packaged and that there are no rips or tears in the packaging. And, if possible, check for any excess moisture or blood in the packaging, as this can indicate a less fresh turkey.
- Budget. Turkeys come in a range of prices, so choose one that fits within your budget while still meeting your quality and size requirements.
How to Thaw a Frozen Turkey
Refrigerator thawing
The best, and safest, way to thaw a frozen turkey is in the refrigerator. Here’s how:
- Leave frozen turkey in its original packaging (unopened) and place on a large rimmed cookie sheet in the refrigerator.
- Allow 24 hours of thawing time per 5 pounds of turkey.
- Use within 2 to 3 days of thawing.
Cold water thawing
In a pinch, you can follow the faster “water bath” method:
- Leave frozen turkey in its original packaging (unopened) and place in a turkey brining bag or food-safe garbage bag, then in a container large enough to hold the turkey and water at room temperature.
- Add ice-cold water to cover the turkey completely.
- Change the water with new ice-cold water every 30 minutes. This step is important in order to ensure the turkey is kept at a safe temperature while thawing.
- Allow 30 minutes of thawing time per 1 pound of turkey.
Roasted Turkey Recipe Ingredients
Here’s what you’ll need to make mom’s foolproof Oven Roasted Turkey. I’ve included the optional ingredients for brining the turkey and for making her pan gravy. Quantities are in the recipe card below.
Organic turkey
For Brining (optional)
Table Salt
Water
For Roasting
Yellow onion
Celery
Carrots
Unsalted butter
For Pan Gravy
Wondra flour
Turkey or chicken broth
How to Brine a Turkey Before Roasting (Optional but Recommended)
Brining is simply soaking the bird in a saltwater mixture, resulting in a more tender, moist turkey once cooked. You can either quick brine or overnight brine.
Quick brine (4 to 6 hours)
- Prep turkey.
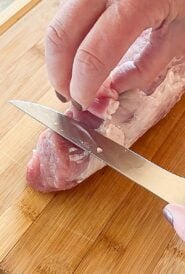
Start by removing the turkey from its packaging and removing the neck, endpiece and bag of giblets (set aside the neck and giblets for making the gravy broth). Rinse the turkey thoroughly under cold water. To avoid cross-contamination, empty your sink of any objects first, and thoroughly clean the sink with soap and water afterward. - Put turkey in brining bag.
Place turkey in a large brining bag or food-safe kitchen garbage bag and set it in a roasting pan if you have room for it in your refrigerator (if not, place the bag inside a cooler large enough to hold the turkey, bag, and brining water). - Mix brining water; add to turkey.
In a separate container, dissolve 1 cup of salt per gallon of water. Mix enough to completely cover the turkey in the bag. Tie shut. Place in the refrigerator, or if using a cooler, add water and ice around the garbage bag and place in a cool spot. - Rinse turkey; pat dry.
After 4 to 6 hours, remove the turkey from salt water and rinse well under cool running water. Thoroughly pat dry inside and out with paper towels. Again, be careful to avoid cross contamination. - Dry turkey in refrigerator.
Place turkey, breast side up, on a flat wire rack set on a rimmed baking sheet and refrigerate, uncovered, to dry for 4 to 24 hours (okay if dries for less time, just make sure to pat thoroughly with paper towels before proceeding).
Overnight brine (12 up to max of 14 hours)
Follow directions for quick brine except reduce salt to 1/2 cup per gallon of water and increase soaking time to 12 to 14 hours.
How to Roast a Turkey in the Oven
Once your turkey is thawed (and brined), it’s time to prep and roast it. Here’s a detailed outline of mom’s technique. In sum, the key to her approach is roasting the bird breast-side down initially, then flipping it over to finish. She also starts the roasting at a high oven temperature, then lowers it, then raises it again.
(Note that roasting times in this section are for a 14 to 15 pound unstuffed turkey. See table below this section for roasting times for other size turkeys and for stuffed birds.)
A. Prepare the Turkey
- Rinse turkey.
If you didn’t brine your turkey, start by removing the turkey from its packaging and removing the neck, endpiece and giblets set aside the latter for making the gravy broth). Rinse the turkey thoroughly under cold water. To avoid cross-contamination, empty your sink of any objects first, and thoroughly clean the sink with soap and water afterward. - Dry turkey; bring to room temperature.
Pat turkey dry with paper towels, ensuring that it is completely dry. Moisture on the skin can prevent it from browning properly. If refrigerated, let turkey sit at room temperature for around 45 minutes to 1 hour before roasting. - Position wings and drumsticks.
Tuck the wings behind the back of the turkey. Tie the drumsticks together with kitchen twine. Some turkeys come with a plastic holder that you can use. Or, truss the turkey.
How to truss a turkey
Start with the twine under the back of the turkey and bring it over the wings, cross it and take it under the legs and back around to tie the legs together, with one crossed over the other at the end.
B. Prep the oven and roasting pan
- Adjust the oven rack to the lowest position and preheat the oven to 400 degrees f.
- Scatter coarsely chopped onion, celery, and carrots in a large roasting pan; pour 1 1/2 cups water over. Set aside.
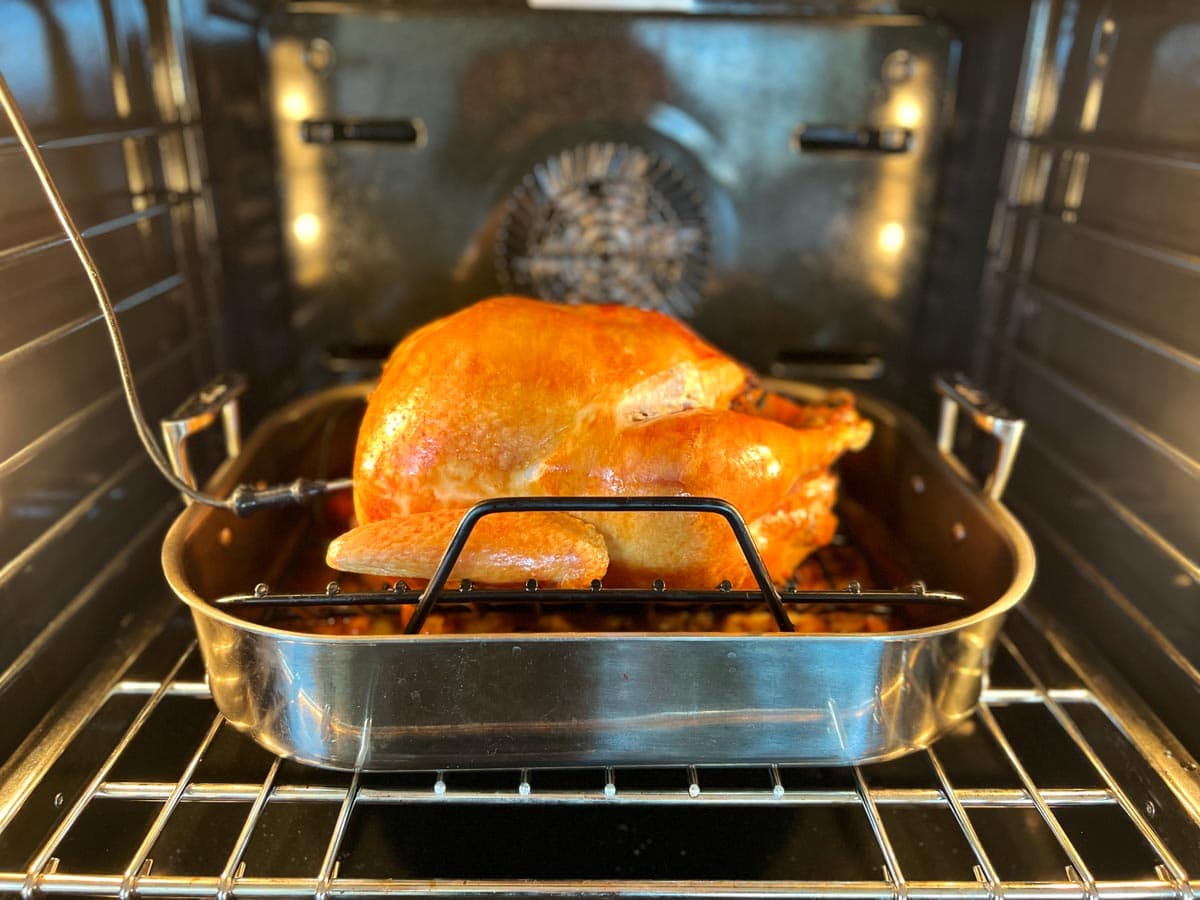
C. Roast the turkey
- Brush turkey with butter, position in roasting pan.
Brush breast side of turkey with melted butter. Set turkey, breast side down, on a non-stick V- or U-shaped roasting rack in the prepared roasting pan (on top of the vegetables); brush back with melted butter. (If roasting rack isn’t non-stick, line with foil.)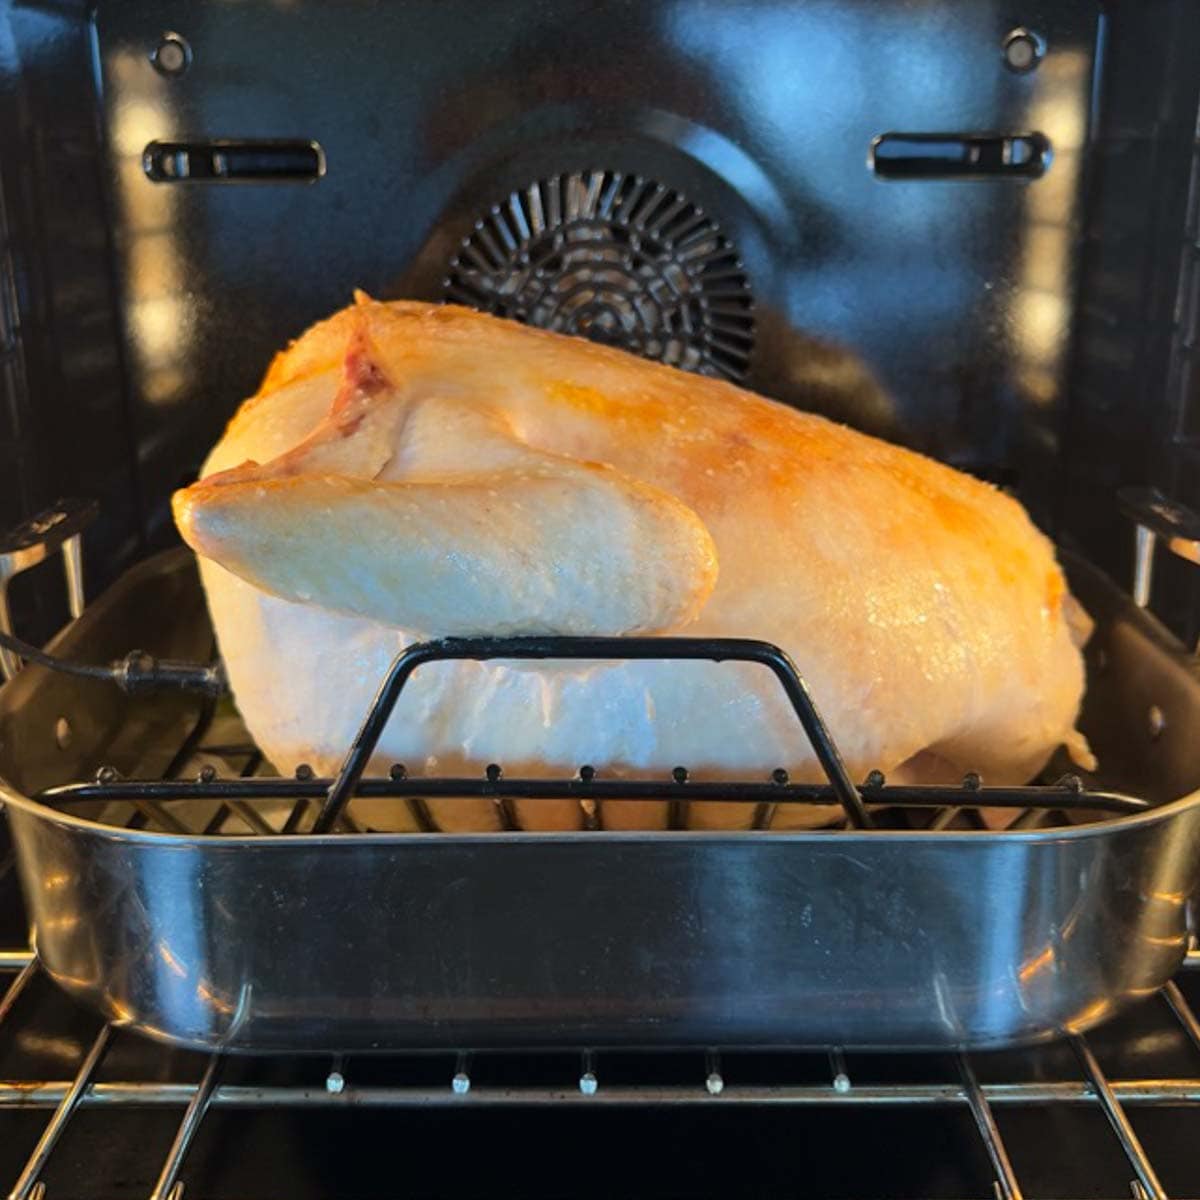
- Insert probe or thermometer.
Insert an oven probe or meat thermometer into the deepest part of the turkey breast, avoiding the bone. Start by inserting the probe/thermometer from the end of the breast, not the top. You want the probe/thermometer to be evenly surrounded by the meat, to the extent possible. Don’t rely on the pop-up thermometer that comes installed in some turkeys; they aren’t reliable. - Roast turkey; then turn temperature down.
Roast turkey for 1 hour, then reduce temperature to 250 degrees and roast 1 3/4 hours longer. Add more water to the vegetables in the pan as needed. - Flip turkey over, increase heat, continue roasting.
Remove pan from oven and, using pot holders, turn the turkey over so the breast side is up. Increase oven temperature to 400 degrees, place turkey back in oven, and continue roasting until the thickest part of breast registers an internal temperature of 160 degrees f on your probe or thermometer – about 3/4 to 1 1/4 hours. Watch it carefully, checking the temperature after 30 minutes if it is nicely browned and looking done.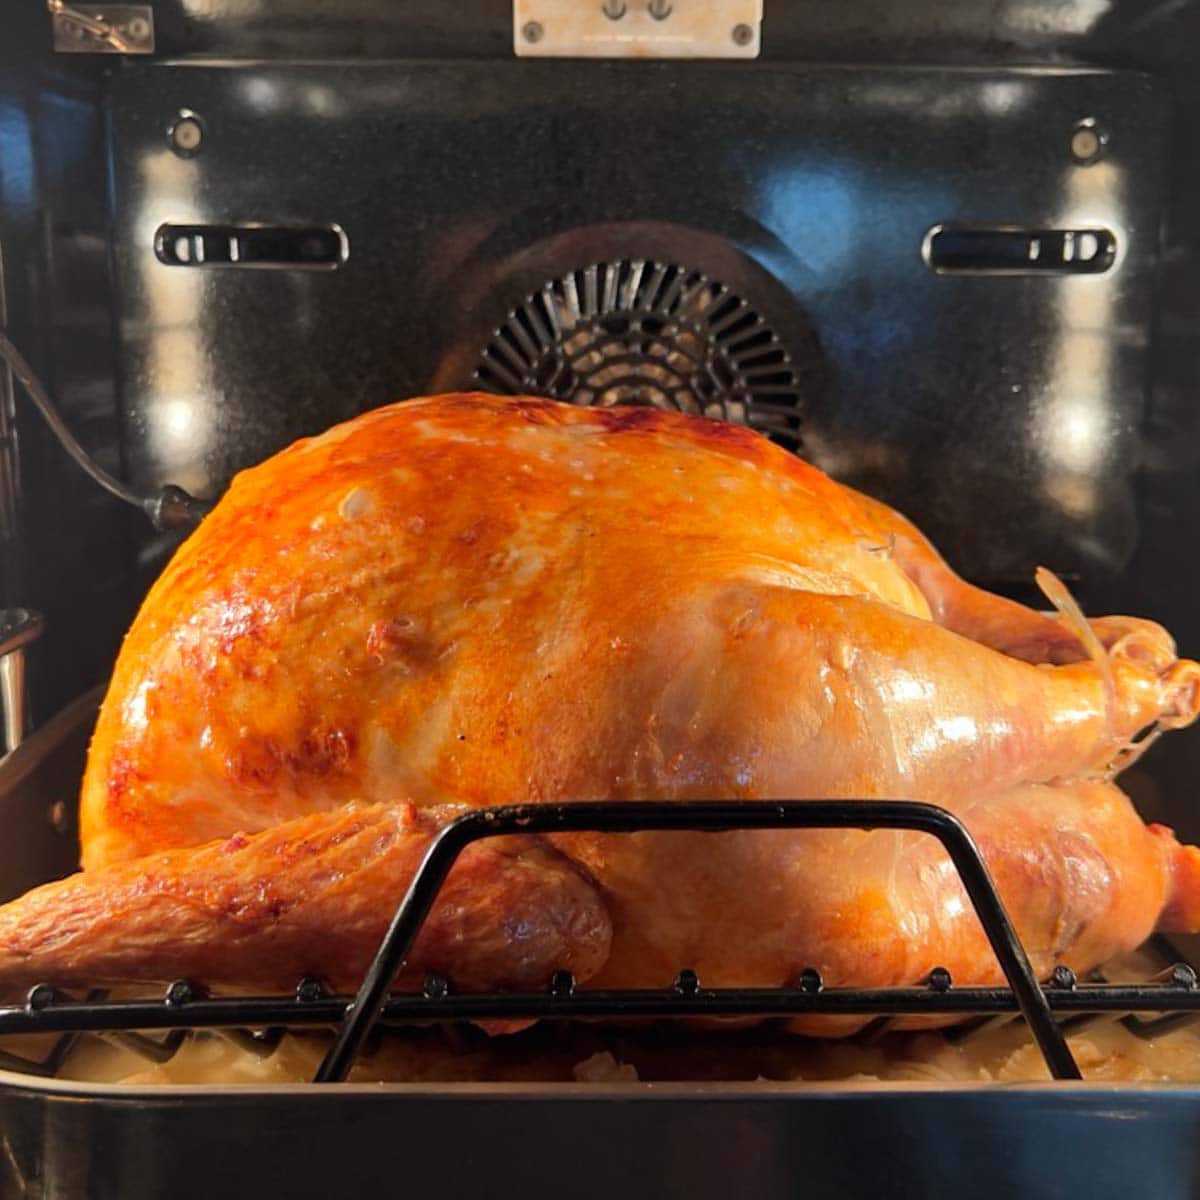
- Let turkey rest.
Remove the turkey from the oven and let sit for 30 to 45 minutes on the rack in the pan, so any drippings accumulate in the pan. In addition, resting the turkey allows the juices to redistribute throughout the meat, resulting in a more flavorful and moist turkey. - Place on cutting board.
After resting, remove bird and place on a large cutting board.
Turkey Roasting Times by Weight
The following table provides approximate roasting times for both stuffed and unstuffed turkeys, broken down by weight. Note that it’s best to determine when your turkey is done with a thermometer. I highly recommend using the built-in temperature probe in your oven, if you have one.

Why Roast Turkey Breast-Side Down Initially?
After reading several different magazine articles, Mom decided to try the technique of oven roasted turkey starting with the breast side down, then flipping it over to finish. The theory is that this approach will keep the breast meat moist and flavorful while allowing the skin to become crispy and brown – without basting. Well, the theory worked – and it became her (and my) preferred way to roast a turkey. Here’s how it works:
- Natural basting. Turkey breast meat is lean and tends to dry out more easily than dark meat. By starting the turkey breast side down, you allow the fat from the back and the dark meat to naturally baste the breast as it cooks, keeping the breast meat moist.
- Crispy skin. Roasting the turkey breast side down for the first part of the cooking process allows the skin on the back to be fully exposed to the heat, crisp up, and become golden brown. When you flip the turkey over later, the breast skin is fully exposed to the heat and becomes crispy as well, without worry of burning.
How to Make Pan Gravy
Here’s how mom made her gravy. Her approach is very straightforward, and results in a deeply flavorful sauce for the turkey and stuffing. The key is vegetables and a bit of water in the roasting pan, both of which catch the flavorful drippings from the turkey while it’s roasting (and while its resting, too). And, the vegetables add flavor to the broth, too!
- Make turkey broth with neck and giblets.
After you put the turkey in the oven, place the neck and giblets (if using) that you have removed from the cavity of the turkey in a medium saucepan. Add water to cover by at least 2 inches. Place on stove and bring to a boil. Turn heat to lowest setting, cover, and let simmer for an hour. Check periodically and add more water as needed. Turn off heat and let cool. Strain cooled broth into a measuring cup. Add more prepared turkey (or chicken) broth as needed so that you have a total of 3 1/2 cups. - Strain drippings from roasting pan.
While the turkey is resting (after roasting), strain pan drippings into a large glass jar, measuring cup, or gravy separator. Remove cooked vegetables from the pan and discard. - Deglaze pan.
Pour 6 tablespoons of the grease back into the roasting pan, place on the stove over medium-low heat, and deglaze the pan as needed, scraping up any browned bits on the bottom. - Add flour.
Whisk in the flour, and continue cooking over low heat for 2 to 3 minutes, whisking constantly. - Add broth.
Add the broth all at once and bring to a slow boil, whisking the mixture constantly until it starts to thicken. - Add turkey drippings.
By now, the turkey drippings in the glass container should have separated. Using a turkey baster, add 1/2 cup of the dark drippings from the bottom of the jar, trying not to include the grease on the top. - Thicken if needed.
If the gravy isn’t thick enough, in a separate container, whisk together 2 tablespoons of flour with 2 tablespoons of hot water. Whisk this paste into the gravy. - Keep warm.
Keep warm over medium-low heat until ready to serve.
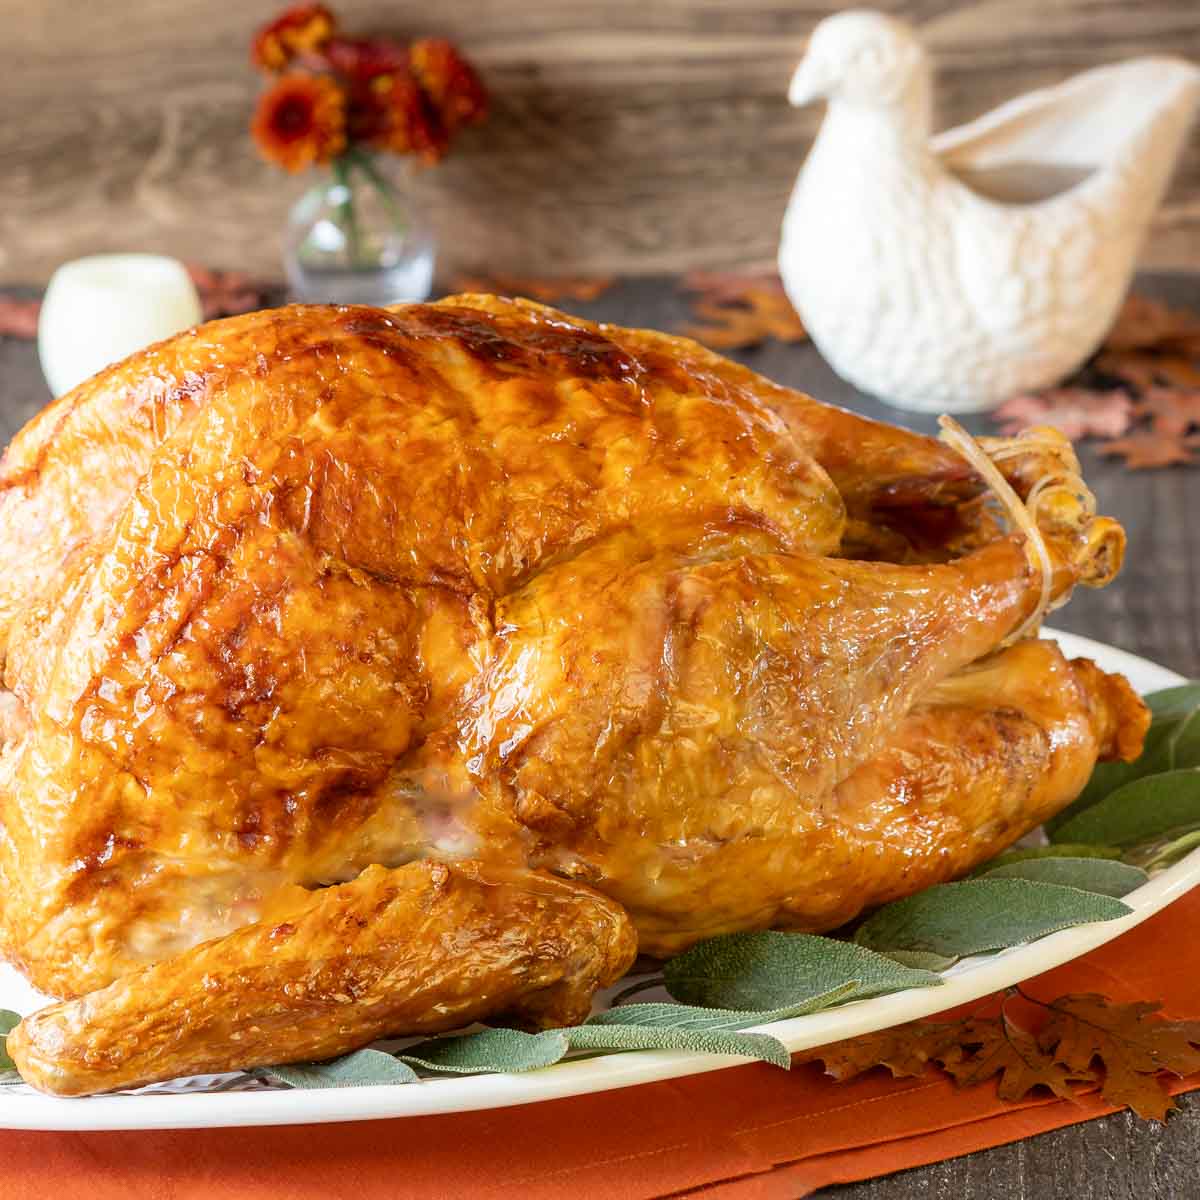
How to Carve and Serve Oven Roasted Turkey
After the turkey has rested, here’s how to carve it for serving:
- Cut away legs (thigh + drumstick).
Slice down through the skin between the breast and the leg. Pull the leg away until you can see the joint that connects the leg. Cut through the joint and skin underneath until the leg is completely separate. - Separate thigh and drumstick; slice thigh meat.
Giggle the thigh and drumstick and feel to find the joint connecting the two. Cut through it. Keeping your knife parallel to the thigh bone, slice the meat off the bone. Keep the drumsticks whole. - Cut away wings.
Similar to how you cut away the legs, pull the wing away from the breast until you can see the joint. Cut through the joint and skin underneath until the wing is completely separate. - Cut away breast meat.
The breast bone is in the middle of the turkey. Place your knife parallel to the bone and as close to it as possible. Slowly cut down to slice one breast away from the bone. Use your other hand to gently pull the breast away from the bone. Repeat with the other breast. - Slice breast meat.
Place breast, skin side up, on a cutting board, and cut crosswise and at an angle into slices. The thickness of the slices is to your taste; I prefer around 1/2-inch thick pieces.
Arrange carved turkey pieces on a large platter
Once your turkey is carved, arrange it on a large platter for serving. Here are some suggestions for how to plate turkey:
- Place the drumsticks, meaty portion out and tips overlapping, at the top of the platter.
- Arrange breast slices, skin side up, slightly overlapping. Either put them along one side of the platter, or in the middle (depending on the size and shape of your platter).
- Since the dark meat typically isn’t in nice-looking slices, arrange it in a sort of neat pile, either next to or around the breast slices.
- Add some sprigs of fresh herbs (parsley, rosemary, etc.) around the turkey pieces to add color to the platter.
- I typically don’t serve the wings because no one ever seems to want them. If desired, you can add them to the platter around the drumsticks.
Oven Roasted Turkey Recipe Variations
Mom took a very straightforward approach to cooking a turkey; she didn’t add in any extra seasonings, and just let the natural flavor of the turkey come through. However, if you want to amp up the seasoning, there are many flavoring options to choose from, depending on your taste preferences. Here are a few choices:
- Salt and herb brine. Add dried herbs such as thyme, rosemary, and/or sage to the salt and water in the brine.
- Herb and vegetable seasoning. Loosely stuff the turkey cavity with sprigs of fresh herbs and onion, celery, and/or carrots to subtly infuse the turkey with more flavor while roasting.
- Spicy. Rub a spice blend of cayenne pepper, chili powder, garlic powder, and onion powder all over the turkey (after buttering).
- Herb Butter. Add chopped fresh herbs like parsley, thyme, and/or sage to the melted butter before brushing on the turkey.
What to Serve with Oven Roasted Turkey
Here are my favorite side dishes to serve alongside this amazing turkey, as part of Thanksgiving dinner:
- Cranberry and Golden Raisin Relish
- Pumpkin with Apple Cashew Stuffing
- Fresh Green Bean Casserole with Cheese
- Roasted Carrot Soufflé
- Southern Corn Pudding
- Lemon Dijon Green Beans
- Quick Dinner Rolls (with Yeast)
You can find even more ideas in this recipe round up Best Sides for Thanksgiving Dinner.
How to Store Oven Roast Turkey Leftovers
Place leftover turkey (off the bone) in a ziptop baggie or other airtight container and refrigerate. It will last for up to 4 days. Leftovers and also be frozen for up to 2 months.
What to do with roast turkey leftovers
I have a separate post that includes Easy and creative recipes using leftover turkey, stuffing, mashed potatoes, gravy and cranberry sauce. In there you’ll find lots of great ideas!
Did you make this recipe?
If you make this recipe, be sure to comment and give it a rating below. Don’t hesitate to ask questions – I’m happy to help!

Best Roasted Turkey Recipe
Ingredients
- 14 pound turkey, rinsed, giblets, neck, and tailpiece removed but not discarded
Brining
- Table Salt
- Water
Roasting
- 1 large yellow onion, coarsely chopped
- 2 celery stalks, coarsely chopped
- 2 carrots, peeled and coarsely chopped
- 1 1/2 cups water, or more as needed
- 6 tablespoons unsalted butter, melted
Pan Gravy
- 3/4 cup Wondra flour, may need more
- 3 1/2 cups turkey or chicken broth, best if use neck/giblets broth –directions follow
Instructions
Quick brine (4 to 6 hours)
- Start by removing the turkey from its packaging and removing the neck, endpiece and giblets set aside the latter for making the gravy broth). Rinse the turkey thoroughly under cold water. To avoid cross-contamination, empty your sink of any objects first, and thoroughly clean the sink with soap and water afteward.
- Place turkey in a large brining bag or food-safe kitchen garbage bag and set it in a roasting pan if you have room for it in your refrigerator (if not, place the bag inside a cooler large enough to hold the turkey, bag and brining water).
- In a separate container, dissolve 1 cup of salt per gallon of water. Mix enough to completely cover the turkey in the bag. Tie shut. Place in the refrigerator, or if using a cooler, add water and ice around the garbage bag and place in a cool spot.
- After 4 to 6 hours, remove the turkey from salt water and rinse well under cool running water. Thoroughly pat dry inside and out with paper towels. Again, be careful to avoid cross contamination.
- Place turkey, breast side up, on a flat wire rack set on a rimmed baking sheet and refrigerate, uncovered, to dry for 4 to 24 hours (okay if dries for less time, just make sure to pat thoroughly with paper towels before proceeding).
H3 Overnight brine (12 up to max of 14 hours)
- Follow directions for quick brine except reduce salt to 1/2 cup per gallon of water and increase soaking time to 12 to 14 hours.
Roast Turkey in the Oven
- If you didn’t brine your turkey, start by removing the turkey from its packaging and removing the neck, endpiece and giblets set aside the latter for making the gravy broth). Rinse the turkey thoroughly under cold water. To avoid cross-contamination, empty your sink of any objects first, and thoroughly clean the sink with soap and water afterward.
- Pat turkey dry with paper towels, ensuring that it is completely dry. Moisture on the skin can prevent it from browning properly. If refrigerated, let turkey sit at room temperature for around 45 minutes to 1 hour before roasting.
- Tuck the wings behind the back of the turkey. Tie the drumsticks together with kitchen twine. Some turkeys come with a plastic holder that you can use. Or, truss the turkey (see Note below).
- Adjust the oven rack to the lowest position and preheat the oven to 400 degrees F. Scatter coarsely chopped onion, celery, and carrots in a roasting pan; pour 1 1/2 cups water over. Set aside.
- Brush breast side of turkey with melted butter. Set turkey, breast side down, on a non-stick V- or U-shaped rack; brush back with butter. (If rack isn’t non-stick, line with foil.) Place in prepared roasting pan (with the vegetables).
- Insert an oven probe or meat thermometer into the deepest part of the turkey breast, avoiding the bone. Start by inserting the probe/thermometer from the end of the breast, not the top. You want the probe/thermometer to be evenly surrounded by the meat, to the extent possible. Don’t rely on the pop-up thermometer that comes installed in some turkeys; they aren’t reliable.
- Roast turkey for 1 hour, then reduce the temperature to 250 degrees and roast 1 3/4 hours longer. Add more water to the vegetables in the pan as needed.
- Remove pan from oven and, using pot holders, turn the turkey over so the breast side is up. Increase oven temperature to 400 degrees, place turkey back in oven, and continue roasting until the thickest part of breast registers 160 degrees f on your probe or thermometer – about 45 minutes to 1 1/4 hours. Watch it carefully, checking the temperature after 30 minutes, if it is nicely browned and looking done.
- Remove the turkey from the oven and let sit for 30 to 45 minutes on the rack in the pan, so any juices accumulate in the pan. In addition, resting the turkey allows the juices to redistribute throughout the meat, resulting in a more flavorful and moist turkey.
- Remove bird and place on a large cutting board.
Pan Gravy
- After you put the turkey in the oven, place the neck and giblets (if using) that you have removed from the cavity of the turkey in a medium saucepan. Add water to cover by at least 2 inches. Place on stove and bring to a boil. Turn heat to lowest setting, cover, and let simmer for an hour. Check periodically and add more water as needed. Turn off heat and let cool. Strain cooled broth into a measuring cup. Add more prepared turkey (or chicken) broth as needed so that you have a total of 3 1/2 cups.
- While the turkey is resting (after roasting), strain juices from the roasting pan into a large glass jar, measuring cup, or gravy separator. Remove cooked vegetables from the pan and discard.
- Pour 6 tablespoons of the grease back into the roasting pan, place on the stove over medium-low heat, and deglaze the pan, scraping up the browned bits on the bottom.
- Whisk in the flour, and continue cooking over low heat for 2 to 3 minutes, whisking constantly.Add the broth all at once and bring to a slow boil, whisking the mixture constantly until it starts to thicken.
- By now, the turkey drippings in the glass container should have separated. Using a turkey baster, add 1/2 cup of the dark drippings from the bottom of the jar, trying not to include the grease on the top.
- If the gravy isn’t thick enough, in a separate container, whisk together 2 tablespoons of flour with 2 tablespoons of hot water. Whisk this paste into the gravy.
- Keep warm over medium-low heat until ready to serve.
Notes
Nutrition
Nutrition information is automatically calculated, so should only be used as an approximation.
Best Roast Turkey Recipe FAQs
Uncovered. If you cover the turkey when roasting, the skin won’t be crispy and nicely browned. If the skin is browning too quickly and could burn, you can tent a piece of foil over the top.
Water in the roasting pan is a hotly debated topic. Water isn’t necessary to obtain a moist turkey, but mom always put water and vegetables in the bottom of the pan to catch the turkey drippings and therefore make a more flavorful broth for the gravy. Without the water, the drippings hit the bottom of the pan and either are cooked off or stick to the pan and burn.
Here are my recommendations for how to keep a turkey moist while roasting:
1. Brine the bird before roasting.
2. Brush or rub the turkey skin with butter before roasting.
3. Don’t overcook it. Use a built-in probe or a quality meat thermometer. Don’t rely on the pop-up thermometer that comes installed in some turkeys; they aren’t reliable.
4. Rest the turkey before carving, which allows the juices to redistribute through the bird.
With our method, you start roasting a turkey at 400 degrees f breast-side down, then turn the heat down to 250 degrees f, then flip the bird over and turn the heat back up to 400 degrees f to finish. This method results in moist, tender turkey meat with crispy, golden skin.


Thank you, thank you for sharing this. Every year I forget how long it takes to thaw my turkey – now I’ve downloaded this guide and will always have the info! And I’m going to try your mom’s method of flipping the turkey. What’s the best way to turn it over?