This Baked Mexican Panko Chicken gets its flavor from the inside out. A bit of salsa verde goes right into the egg wash used for breading the chicken, and the panko crust is loaded with spices. The breaded chicken is coated and baked in hot melted butter, so it browns and crisps like it was pan-fried. Served over lettuce with avocado, tomatoes, salsa verde, and cheddar, it’s a complete, colorful dinner that’s easy and elegant enough for a weeknight or a table full of guests.

Note: This post contains referral links for products I recommend. As an Amazon Associate, I earn a small commission on qualified purchases, at no cost to you.
A Quick Look at the Recipe
✅ Recipe Name: Baked Mexican Panko Chicken
⏲️ Ready In: About an hour; 15 minutes of hands-on prep
🥣 Main Ingredients: Chicken breast, panko, eggs, salsa verde, avocado, cheddar
📖 Dietary Info: Contains gluten, egg, dairy; gluten-free adaptable with GF panko
♨️ Method: Oven-fried in hot butter
🍽️ Yield: 6 servings
⭐️ Difficulty: Easy
Summarize and save this content on:
My dad was raised in Tucson, Arizona, and my mom went to the University of Arizona, so growing up, I was immersed in the vibrant flavors of Mexican cuisine. Mom taught me how to use various Southwestern ingredients to create new, flavorful dishes, which inspired this crispy baked Mexican chicken recipe.
My trick for maximum flavor includes adding salsa verde to the egg mixture used for dipping the chicken, and a blend of chili powder, cumin, garlic salt, and oregano to the breadcrumbs. The crispy chicken is served over lettuce with grape tomatoes, avocado, salsa verde, sour cream, and cheddar for a balanced and complete meal.
Love flavorful, yet easy chicken dishes? Try these grilled lemon chicken breasts and my arroz con pollo recipe next.
Table of Contents
Why This Recipe Works
- Seasoned twice. Salsa verde goes into the egg wash, chili powder and cumin go into the panko. This builds more flavor.
- Hot butter, not oil. Turning the breaded chicken in melted butter before baking, then cooking it in the butter, browns and crisps the crust like pan-frying, with none of the oil mess.
- Chilling sets the crust. A short rest in the fridge before baking helps the panko adhere, so it stays put instead of falling off in the oven.
- Cutlets cook evenly. Pounding to an even thickness means the chicken cooks through at the same rate the crust needs to brown. I use this same method to make chicken cutlets for chicken piccata.
- One plate, complete meal. Chicken over greens with avocado, tomatoes, salsa, and cheese needs no side dish.
Ingredients Needed
Here’s all you need to make this baked panko chicken, all of which should be available at your local grocery store (details are included in the recipe card below).
Ingredients for the panko chicken:
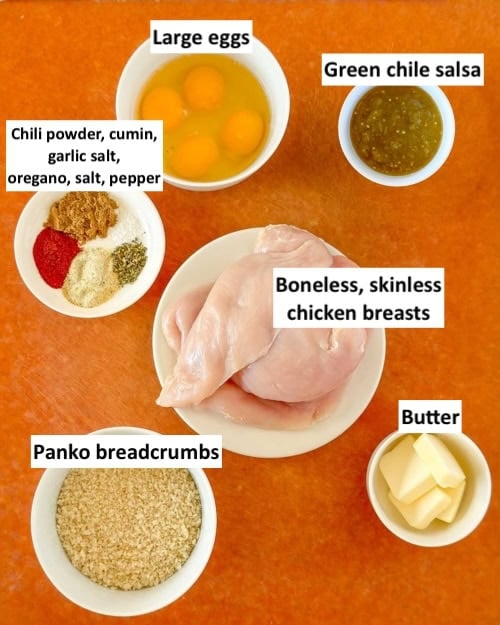
- Panko breadcrumbs: Their coarse, airy texture is what gives this chicken its crunch. Avoid fine breadcrumbs, which pack down and turn dense instead of crispy. Rice panko or certified gluten-free panko works as a swap. Use the leftovers to make this crispy spinach stuffed salmon for another meal during the week.
- Salsa verde: Also called tomatillo-green chile salsa. I like Trader Joe’s or La Victoria, or use my homemade Tomatillo Avocado Sauce on page 124 in my cookbook Fresh Tastes. Some goes into the egg wash for flavor, and the rest is for serving.
- Mexican oregano: It’s earthier and slightly citrusy compared to Mediterranean oregano. Worth seeking out to use in this type of recipe for its unique flavor, but regular oregano will still work.
- Garlic salt: Adds both garlic flavor and salt. If substituting garlic powder, add a bit more salt to the crumb mixture.
- Butter: Melting butter in the baking pan before adding the chicken is what browns and crisps the crust; it does the work of frying without the oil or mess.
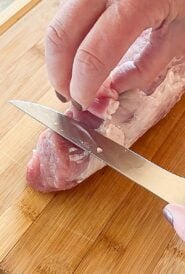
- Chicken cutlets: Butterfly larger breasts and pound smaller ones to an even thickness. Even cutlets cook more evenly and at the same rate as the crust needs to brown.
Ingredients for serving:
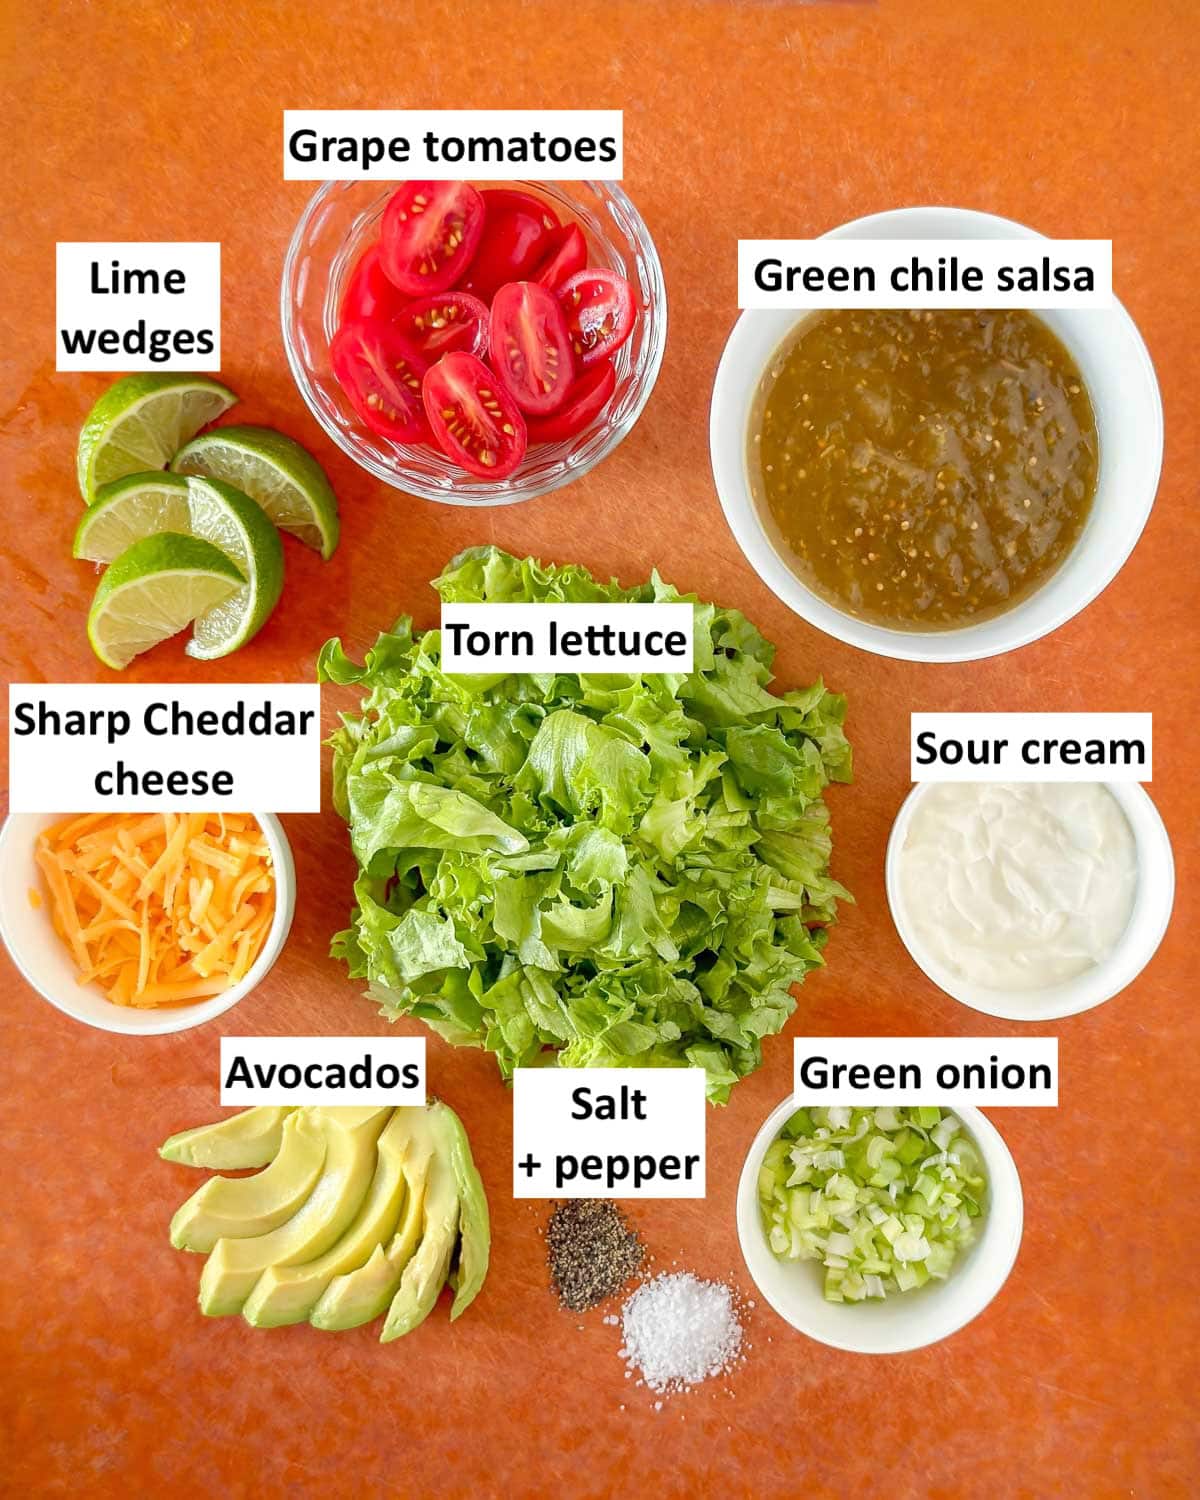
- Ripe avocados: Choose avocados that give slightly to the touch or to gentle pressure for the best flavor and texture.
- Vegetables: Torn lettuce makes the base for the Mexican breaded chicken, while green onions and grape or cherry tomatoes are sprinkled over the top.
- Other toppings: Add sour cream, sharp cheddar cheese, more salsa verde, and lime wedges to complete the dish. This homemade avocado tomatillo sauce makes a flavorful addition as well.
Variations and Substitutions
While this Baked Panko Chicken Breast recipe is delicious as is, it is also very flexible and can be modified to accommodate your dietary needs and tastes. Here are a few suggestions:
- Swap the chicken. Substitute boneless chicken thighs or chicken tenders for the chicken breasts. I think chicken breasts look prettier on the plate when serving.
- Lighter version. Use yogurt instead of sour cream for fewer calories, a little more protein, and a tangier flavor.
- Add cilantro. Mix chopped cilantro with the lettuce to layer in even more Mexican flavor.
- Make it spicy. Spice it up by adding cayenne pepper to the panko crumbs and sliced jalapenos to the plate.
- Change the cheese. Instead of cheddar, use cotija or pepperjack cheese.
How to Make Baked Mexican Panko Chicken
Here’s a step-by-step guide on how to prepare this easy panko-crusted chicken. If you’re more of a video person, see the video link in the recipe card at the bottom of this post.
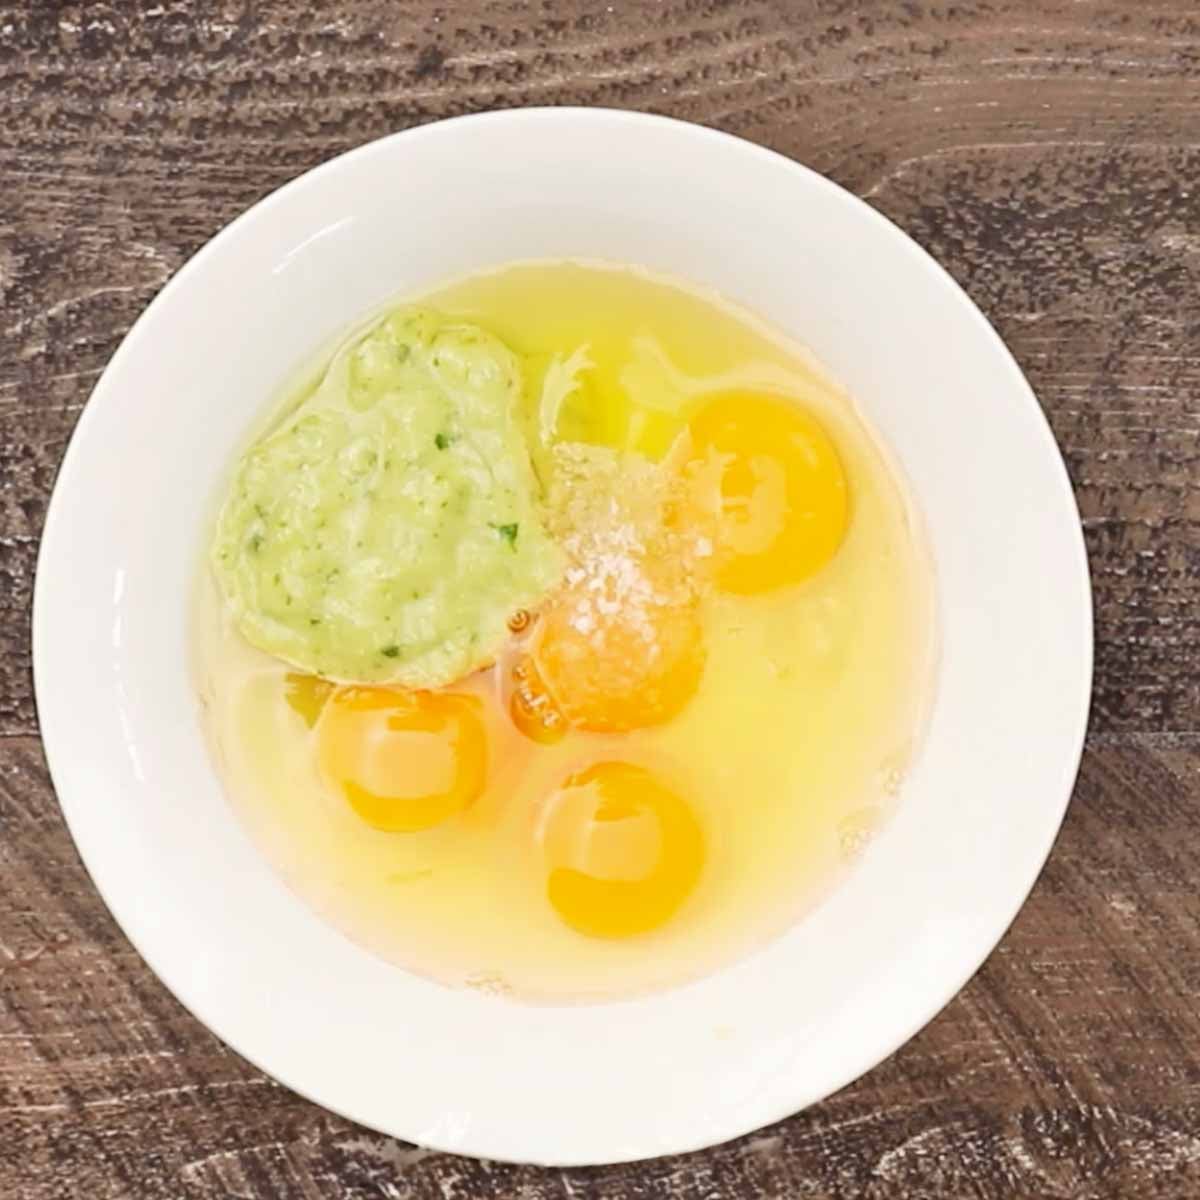
- Make the egg mixture. Whisk together the eggs, 3 tablespoons of the salsa, and salt in a shallow bowl.
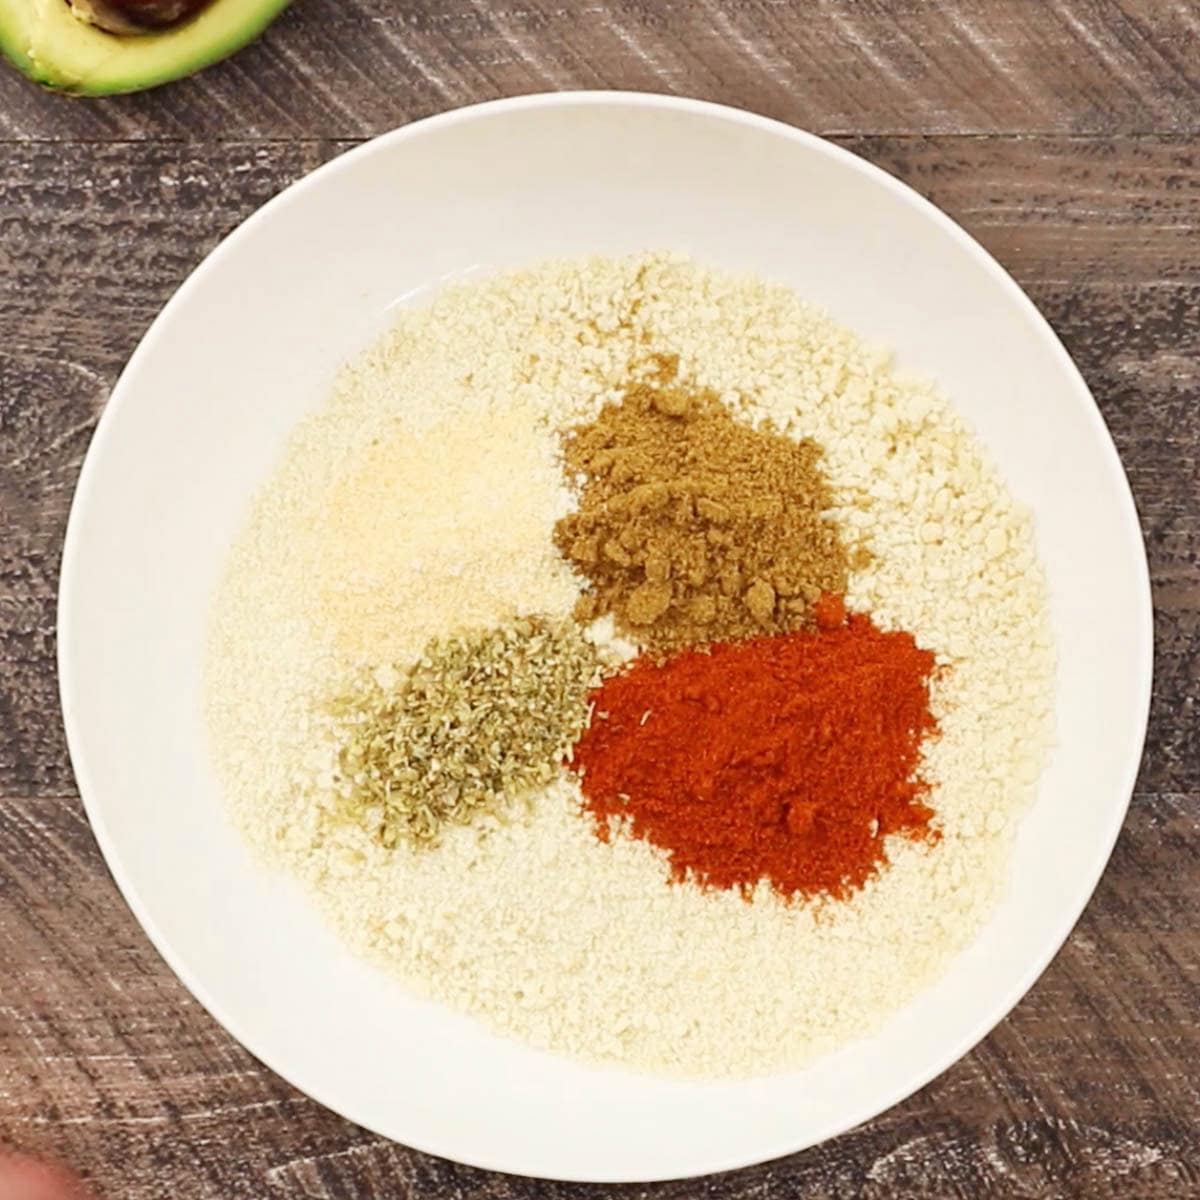
- Make the breading. Stir together the breadcrumbs, chili powder, cumin, garlic salt, and oregano in a separate bowl.
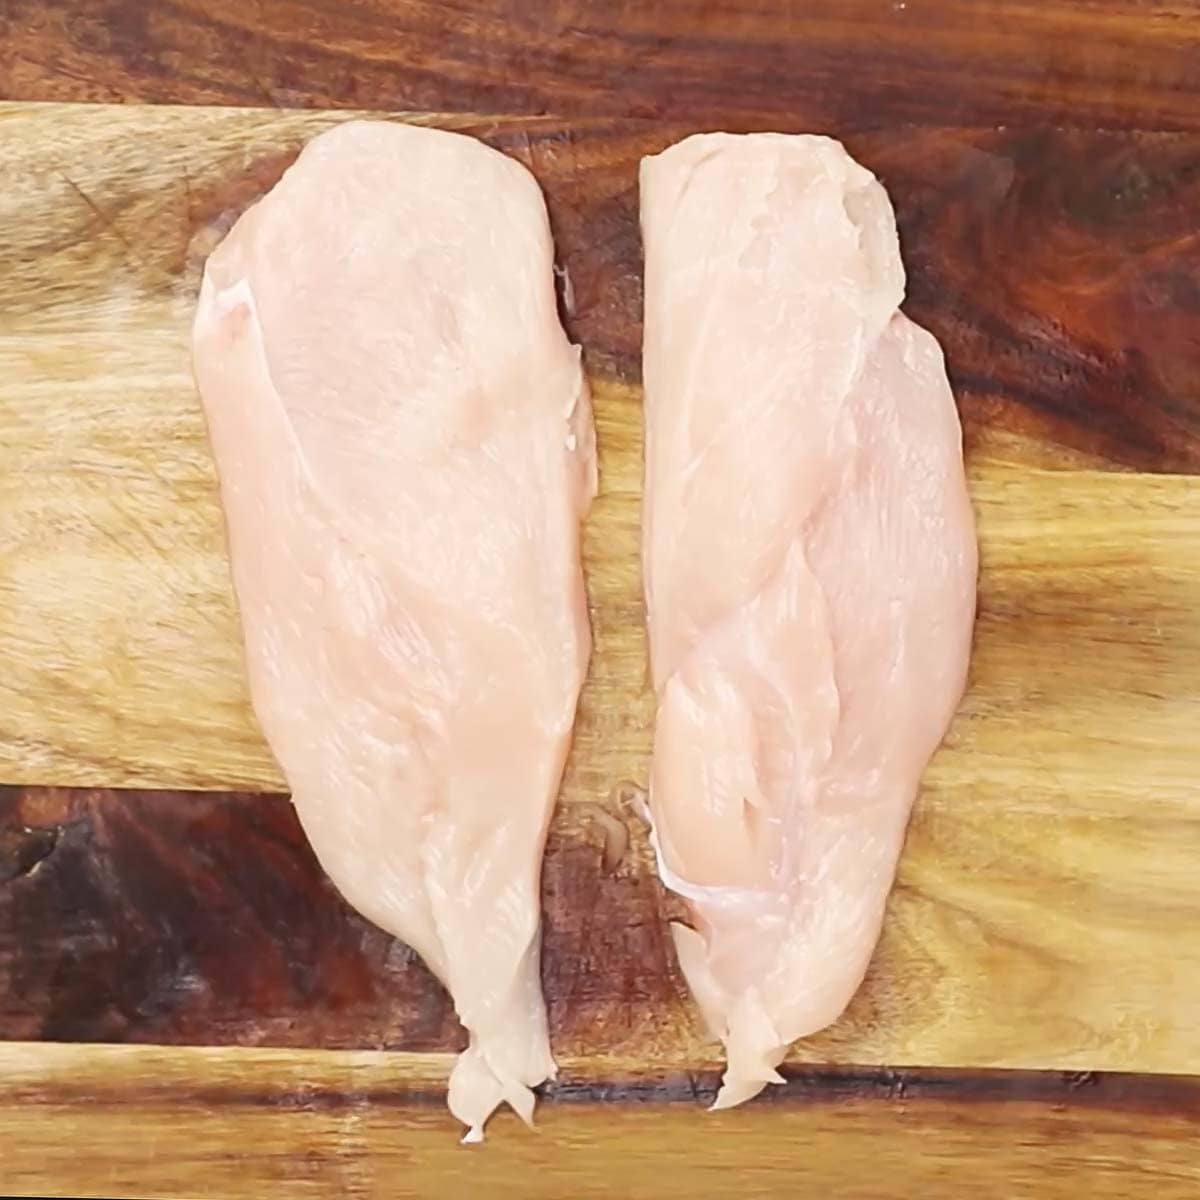
- Make chicken cutlets. Butterfly larger breasts by cutting each breast into two pieces. Pound each piece to roughly an even thickness.
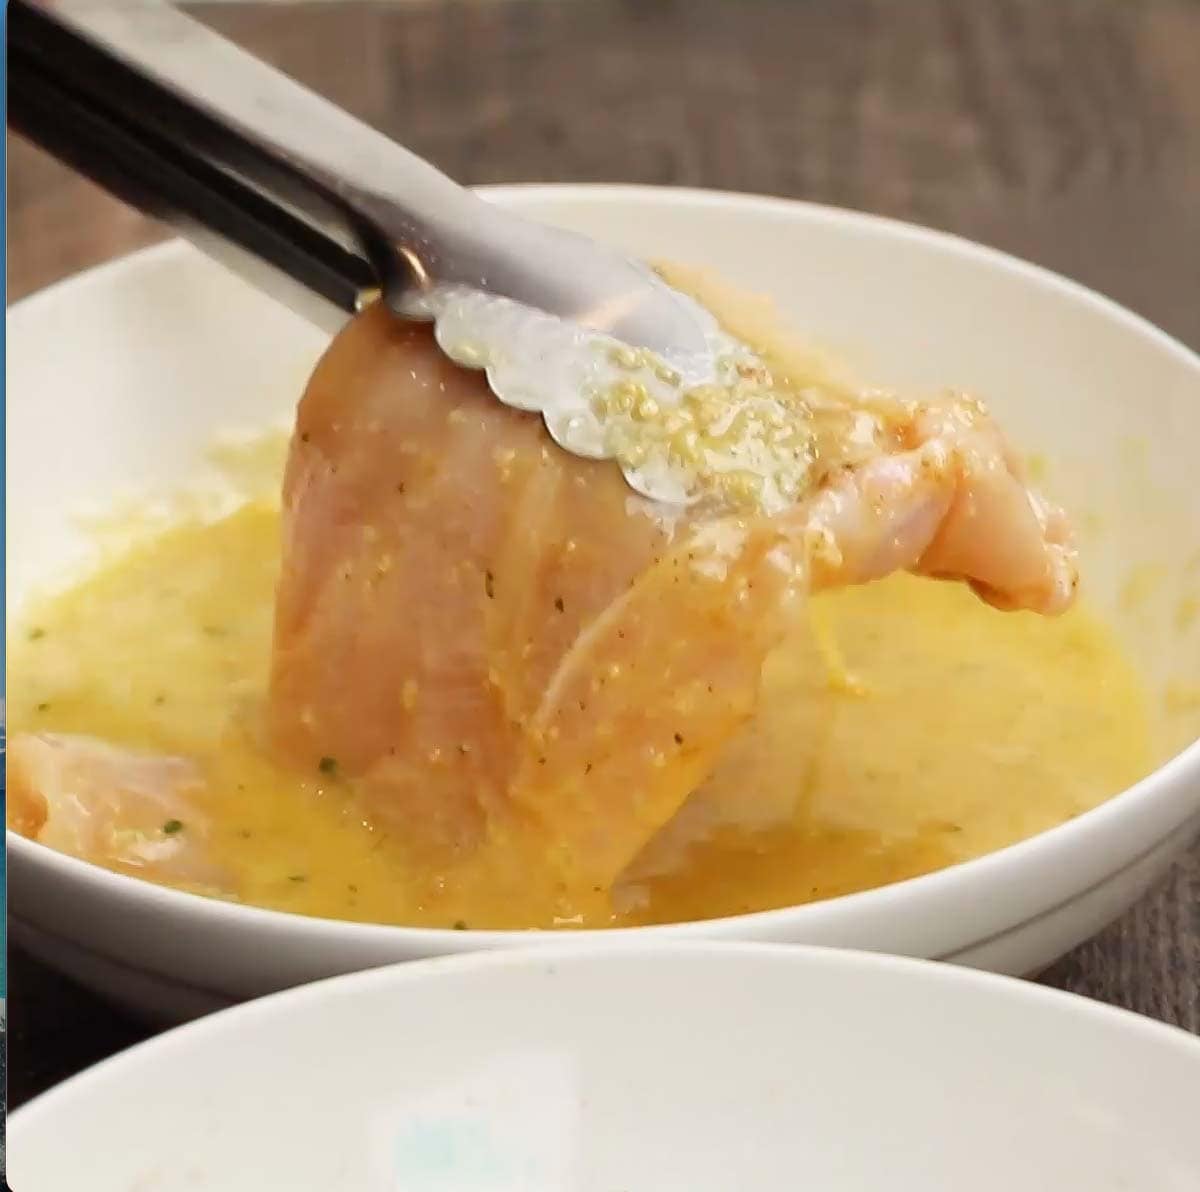
- Coat in egg mixture. Dip each breast in the egg mixture to coat the entire piece. Allow the excess to drip off before dipping into the breadcrumbs.
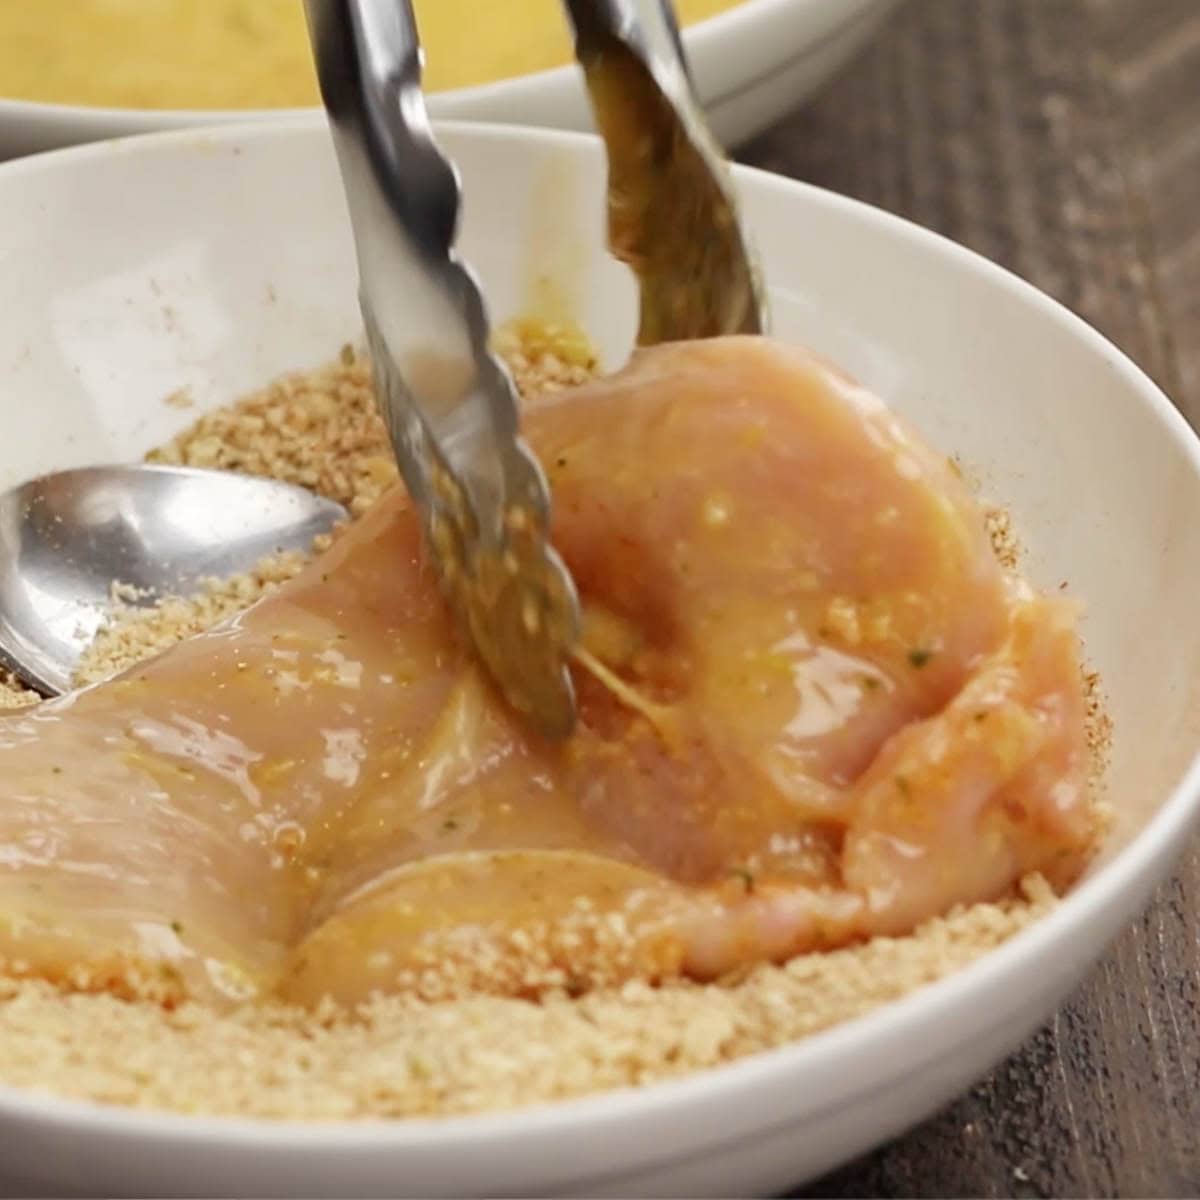
- Bread the chicken. Dredge the chicken in the panko mixture, coating all sides evenly. Press down on the breadcrumbs to ensure they adhere.
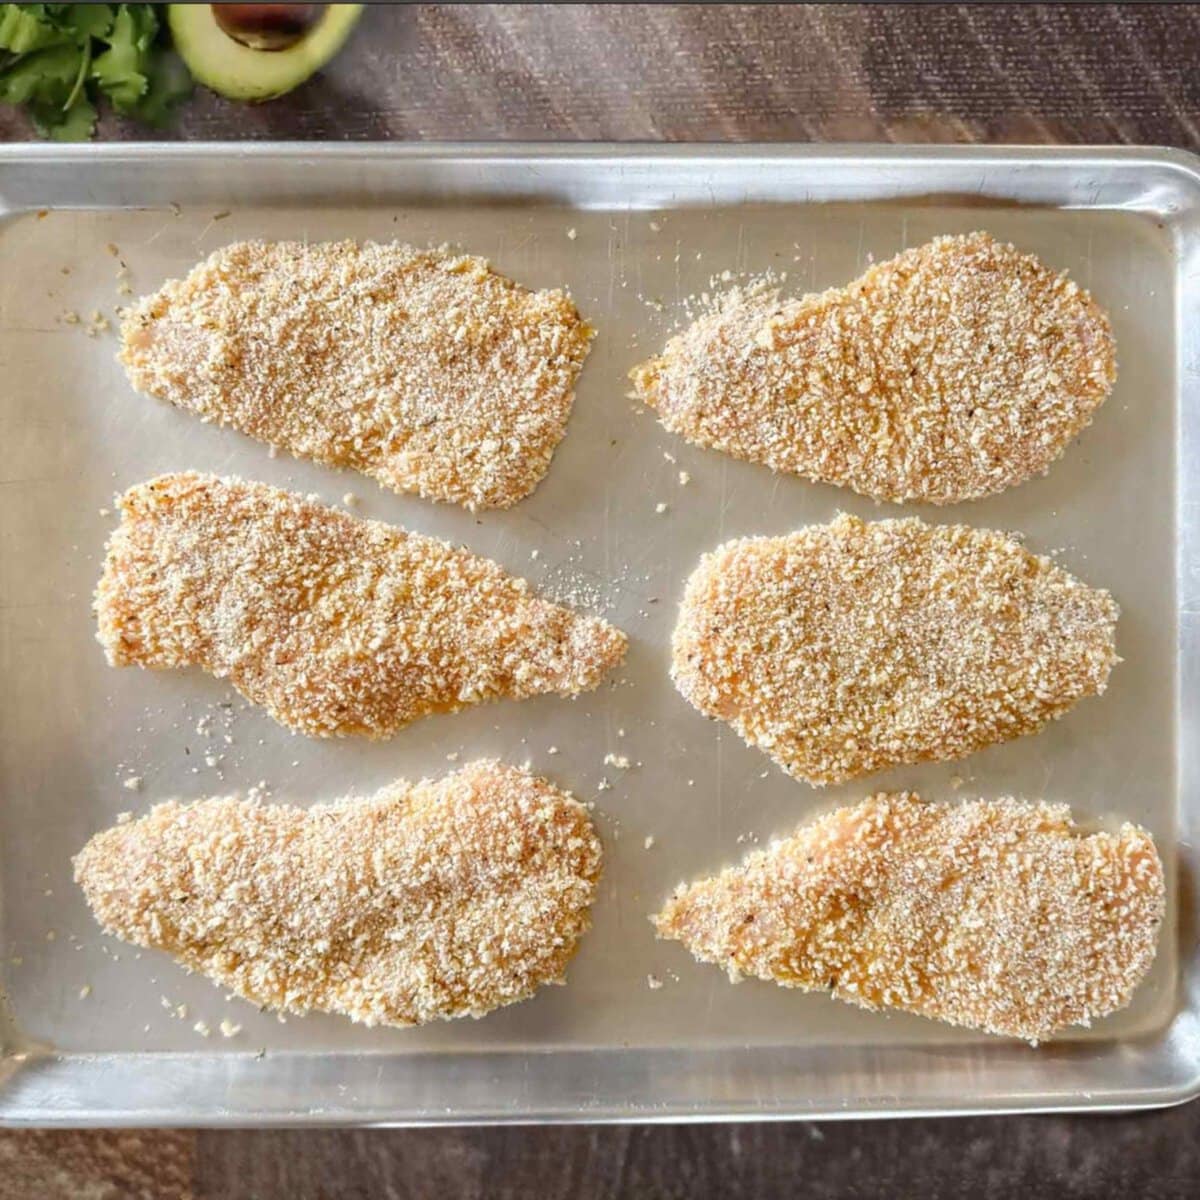
- Refrigerate chicken. Place the coated chicken in a single layer on a baking sheet and refrigerate for at least 15 minutes (up to 8 hours). This allows the coating to set.

- Preheat oven and melt butter. Preheat the oven to 350°F. Once the oven is hot, place the butter in a large shallow baking dish (not glass) and place the dish in the oven. Use a dish large enough to hold the chicken breasts in one layer. When the butter melts, remove the pan from the oven. Melting the butter only takes a few minutes, so watch closely as the butter burns easily.
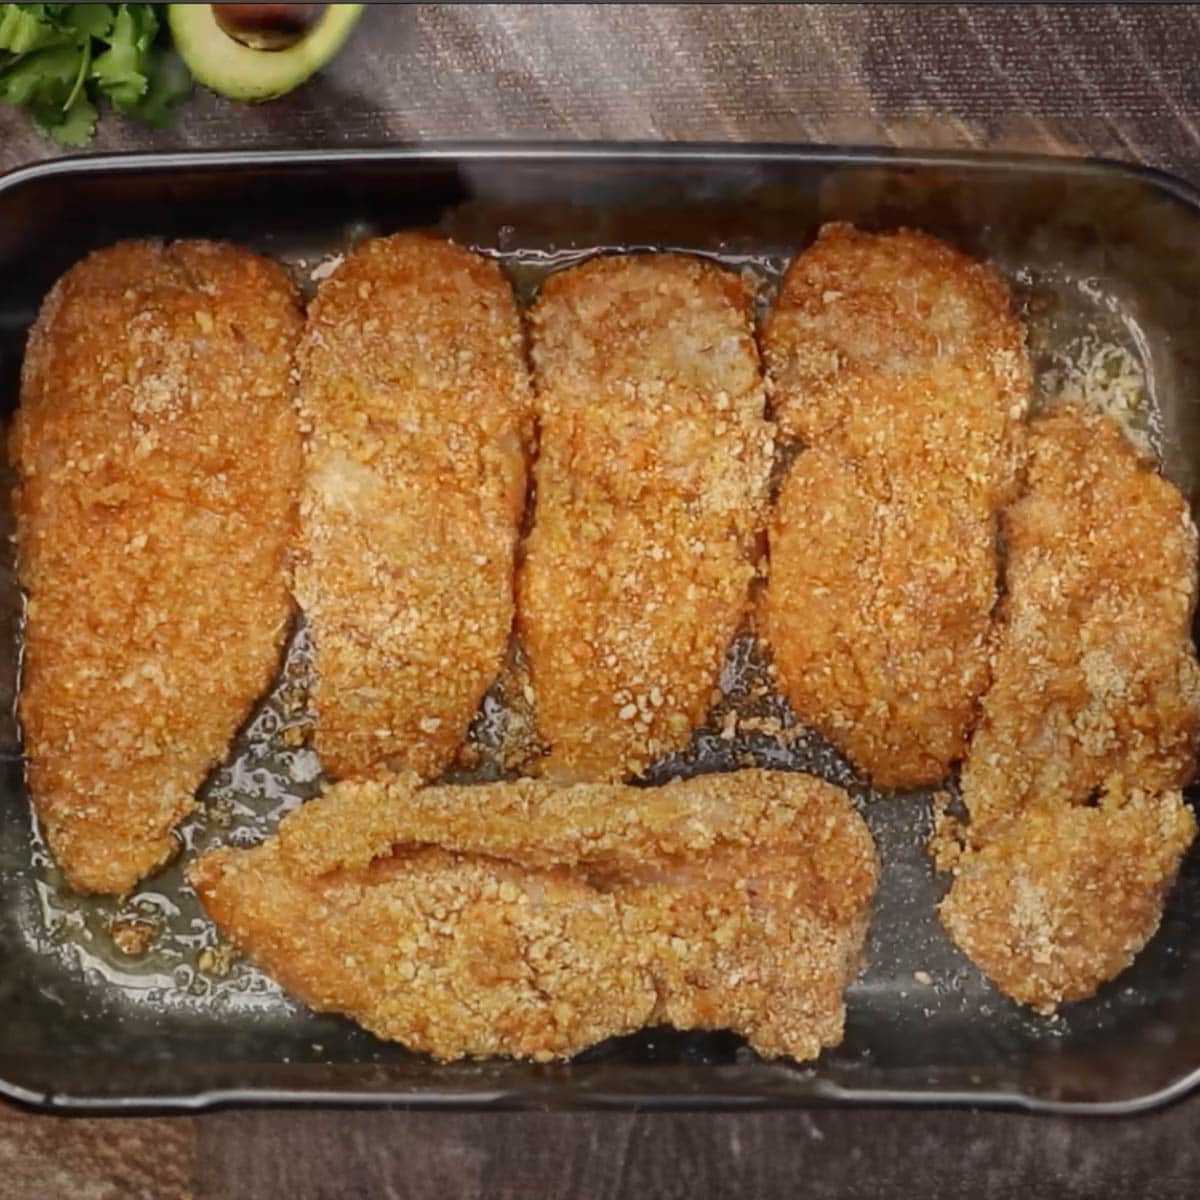
- Bake chicken. Carefully place the chicken pieces in the hot pan, turning to coat both sides with the melted butter. Bake, uncovered, 25 to 30 minutes or until chicken is golden brown and an instant-read thermometer inserted into the thickest portions registers 165 degrees. Remove from the oven and let the cooked panko chicken rest for 5 minutes before serving.
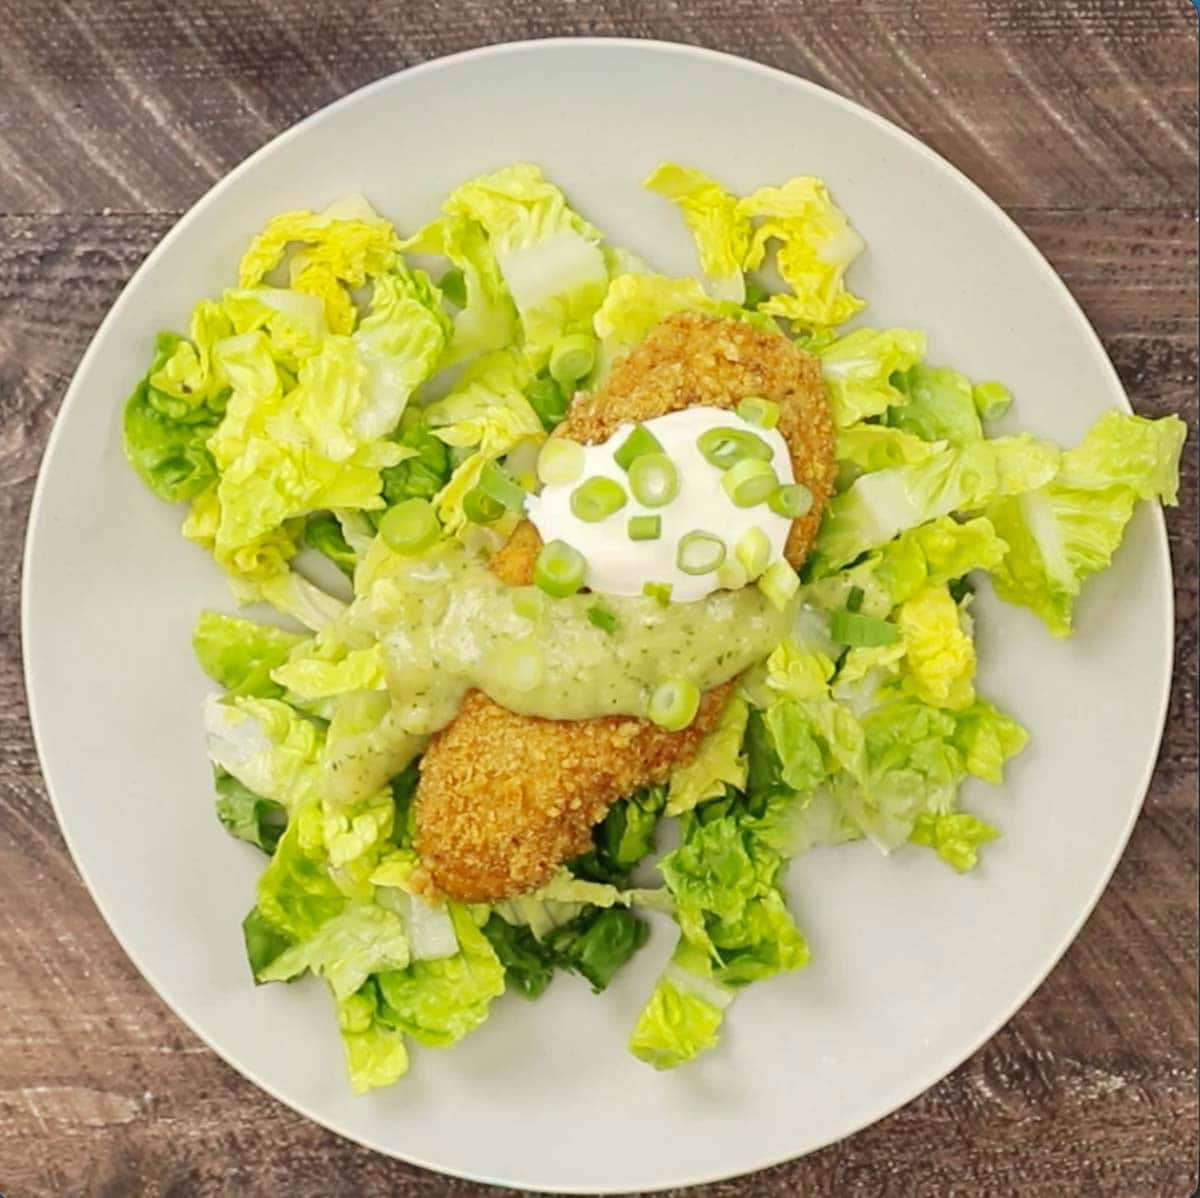
- Assemble the plate. Place 1 cup of shredded lettuce on each of 6 serving plates and top with a chicken breast. Add a dollop of sour cream and salsa on top of the chicken, and sprinkle about 1 tablespoon of green onion over the chicken.
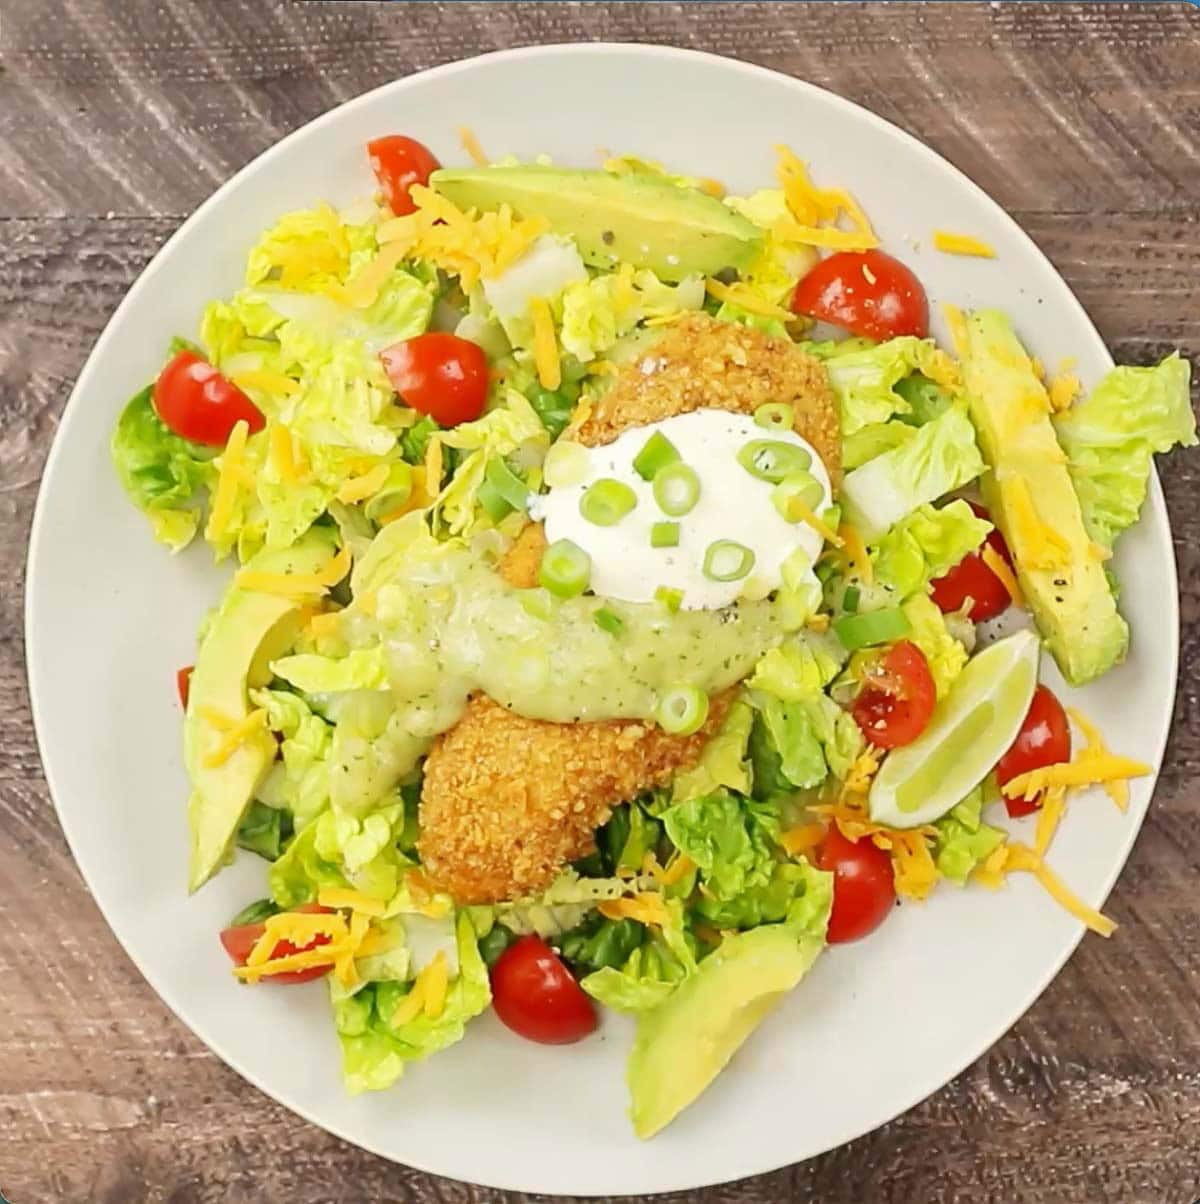
- Add tomato and avocado. Arrange 12 tomato halves and slices from 1/2 avocado equally on each plate, placing them decoratively on the lettuce around the chicken breast. 11. Garnish and serve. Season with salt and freshly ground pepper, sprinkle cheddar cheese over the top, and
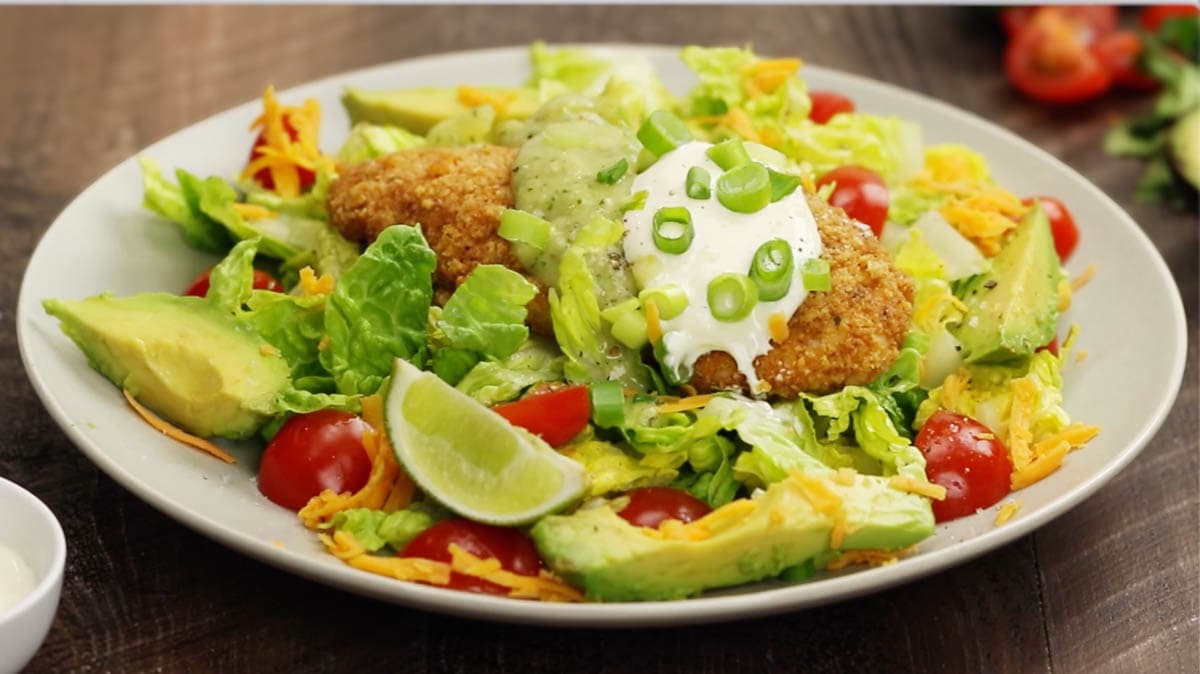
11. Garnish and serve. Season with salt and freshly ground pepper, sprinkle cheddar cheese over the top, and garnish with a lime wedge on each plate. Serve additional salsa and sour cream in bowls on the side. This easy black bean soup makes a tasty starter for the meal.
Tips for Success
- Refrigerate the breaded chicken before cooking. Refrigerating for at least 25 minutes allows the breading ingredients to blend and adhere to the chicken.
- Use a metal pan, not glass. Metal conducts heat faster, so it browns the crust the way a hot skillet would, while glass or ceramic heats slower and holds moisture, which leaves the panko soft.
- Don’t crowd the chicken. Crowding the pan traps steam between pieces, so the same soggy problem happens even in a metal pan. For best results, give each cutlet room so it can crisp on all sides.
- Let the fried chicken sit for 5 minutes before serving. This step allows the breading to get nice and crispy and also allows the juices to redistribute throughout the chicken, making it moist and tender.
Make Ahead, Storage, and Reheating
- Make ahead: The chicken breasts can be coated with the breadcrumbs, placed in a single layer on a cookie sheet, covered, and refrigerated up to 8 hours ahead. You may need to increase the cook time by 5 to 10 minutes, depending on how long they are refrigerated.
- Storing leftovers: If you have any leftover chicken, place it in an airtight container and refrigerate. It will last up to 4 days, but the panko coating may become a bit soggy after 2 days. To reheat, place on a wire rack in a 300-degree oven for 10 to 15 minutes.
Baked Mexican Panko Chicken Recipe FAQs
Dip the chicken fully in the egg mixture, letting the excess drip off, then dredge it firmly in the panko on all sides. Be sure to press down on the crumbs as you go. A firm, even press matters more than a thick coating. Then, give the breaded chicken time to rest in the refrigerator to allow the breading to set.
Bake on a metal pan, not glass, with the chicken spread out so it isn’t crowded, and leave it uncovered. Turning the cutlets in hot melted butter before baking also helps the crust brown and crisp instead of steaming.
Usually it’s because the coating wasn’t pressed on firmly enough, or the chicken went straight into the oven without chilling first. Refrigerating the coated chicken for at least 15 minutes lets the crust set and bond to the chicken before it bakes.
Panko breadcrumbs are coarser, lighter, and have a neutral flavor. Regular breadcrumbs are finer-grained and may have a slightly sweet or savory taste.
Serving Suggestions
This chicken is a complete plate on its own, but it’s easy to build into a full menu. Add a side of black bean corn salsa or spicy artichoke cheese dip to start.
If you’re feeding a crowd, it pairs well alongside other Tex-Mex favorites like this shredded chicken taco salad for a laid-back dinner party spread.
More Easy Chicken Recipes


Did you make this recipe?
If you make this recipe, be sure to comment and give it a rating below. Don’t hesitate to ask questions – I’m happy to help!

Crispy Baked Mexican Panko Chicken
Ingredients
- 4 large eggs
- 1 1/2 cups purchased salsa verde, see Note below
- 1/4 teaspoon kosher salt
- 1 1/4 cups panko breadcrumbs
- 2 teaspoons chili powder
- 2 teaspoons ground cumin
- 1 1/2 teaspoons garlic salt
- 1/2 teaspoon dried oregano
- 1 pound boneless skinless chicken breast halves, 3 large
- 3 tablespoons butter, cut into 3 to 4 pieces
- 6 cups shredded lettuce
- 6 tablespoons sour cream
- 6 tablespoons chopped green onion
- 36 grape or small cherry tomatoes, cut in half
- 3 avocados, peeled, seeded and sliced
- Kosher salt, to taste
- Freshly ground black pepper, to taste
- 6 tablespoons grated sharp Cheddar cheese
- 6 lime wedges
Instructions
- In a shallow bowl, whisk together the eggs, 3 tablespoons of the salsa and salt. In another shallow bowl, stir together the breadcrumbs, chili powder, cumin, garlic salt and oregano.
- Butterfly larger breasts and cut into two pieces; pound smaller breasts to roughly an even thickness. Dip each breast in the egg mixture, allowing the excess to drip off. Then, dredge in the breadcrumb mixture, coating all sides evenly. Press down on the breadcrumbs to ensure they adhere.
- Place coated chicken pieces in a single layer on a baking sheet and refrigerate for at least 15 minutes (up to 8 hours) to allow the coating to set.
- Preheat oven to 350 degrees F.
- Once oven is preheated, place the butter in a large shallow baking dish (not glass) large enough to hold the chicken breasts in one layer, and place in the oven. As soon as the butter melts (just takes a few minutes), remove the pan from the oven (watch closely as the butter burns easily).
- Carefully place the chicken pieces in the hot pan, turning to coat both sides with the melted butter. Bake, uncovered, for 25 to 30 minutes or until chicken is golden brown and an instant-read thermometer inserted into the thickest portions registers 165 degrees.
- Let cooked panko chicken rest for 5 minutes before serving.
- To serve, place 1 cup of shredded lettuce on each serving plate. Top with a chicken breast. Place a dollop of sour cream and salsa on top of each chicken breast. Sprinkle about 1 tablespoon of green onion over chicken. Arrange 12 tomato halves and slices from 1/2 avocado equally on each plate, placing them decoratively on the lettuce around the chicken breast. Season to taste with salt and freshly ground pepper. Sprinkle Cheddar cheese over each serving. Place a lime wedge on each plate. Pass additional salsa and sour cream on the side.
Notes
Nutrition
Nutrition information is automatically calculated, so should only be used as an approximation.
Note: This recipe was originally posted in 2013, updated in 2024, and significantly updated again in October 2024, adding more detail, tips, and process shots.