Take your next homemade pie from good to stunning with a Lattice Pie Crust. While this elegant woven design may appear daunting at first, it’s actually surprisingly easy to prepare! Just follow this step-by-step guide to making a perfect lattice crust, complete with detailed instructions and helpful photos.
Table of Contents
What is a Lattice Pie Crust?
A lattice pie crust is both a decorative and a functional top for a pie. It’s created by weaving strips of pie dough over the top of the pie filling, resulting in a beautiful, open-weave pattern. This design allows for better heat distribution and evaporation of moisture – no need to cut slits in the top crust. And, it provides an elegantly rustic finish that is both beautiful and impressive! Often added to fruit pies, I always put a lattice top on my mom’s Rhubarb Pie.
Tools and Ingredients Needed for a Lattice Pie Crust (One Pie)
Here’s what you’ll need to create an impressive pie with a lattice top:
Tools:
- Pie dish
- Rolling pin
- Pastry wheel (preferably fluted), pizza cutter (also called a pizza wheel),, or large sharp knife
- Optional: a silicone mat
Ingredients:
- 2 pie crusts (I recommend our Easy Flaky Pie Crust), refrigerated
- Prepared pie filling, for 1 pie (I recommend mom’s Rhubarb Pie)
- All-purpose flour (for the rolling surface, to keep the dough from sticking)
- 1 large egg (for the egg wash to brush on top)
How to Make a Lattice Pie Crust
Here’s a detailed overview of each step in the process of a woven lattice pie crust:
- Prepare bottom crust; refrigerate.
On a lightly floured surface, roll out the bottom crust dough to an even into a 12-inch circle. Transfer to a 9-inch pie pan. Trim any extra dough from the pastry edge – so there’s around a 3/4-inch overhang. Poke the bottom of the crust with a fork in several places. Refrigerate for at least 30 minutes.
- Add filling.
After bottom crust has chilled for at 30 minutes, remove from the refrigerator and spoon in the prepared filling. - Cut strips for lattice crust.
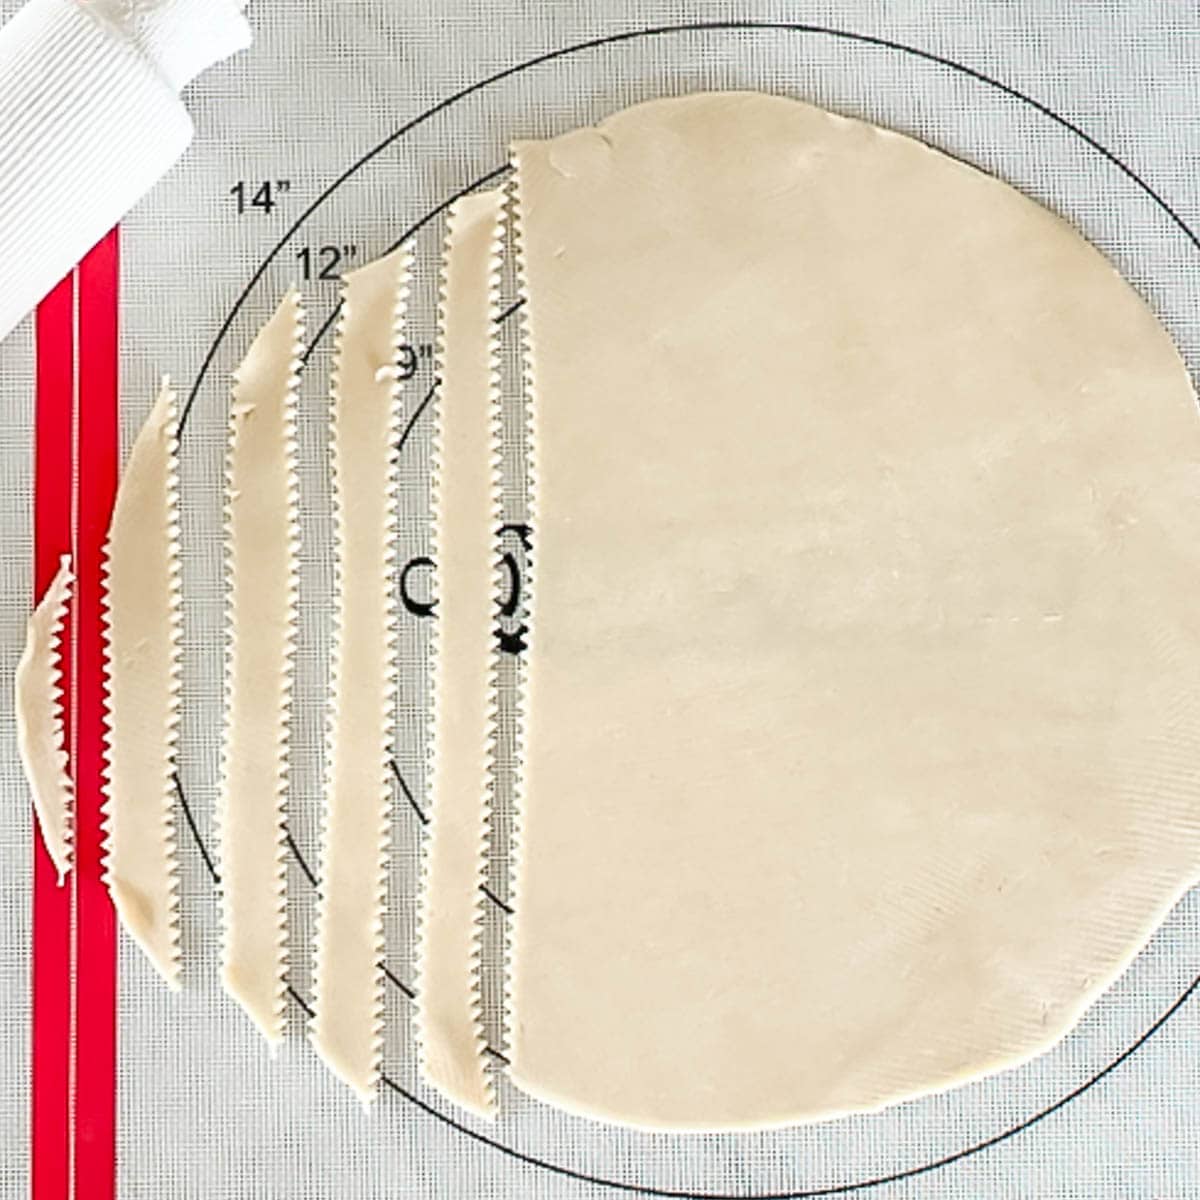
Roll dough for the top crust into a 12-inch circle. Use a pastry wheel (fluted or straight edge) or a large sharp knife to cut the dough into 1/2 to 1-inch wide strips; place strips on a large cookie sheet, side by side. Refrigerate strips for at least 30 minutes.
- Place 5 strips on pie.
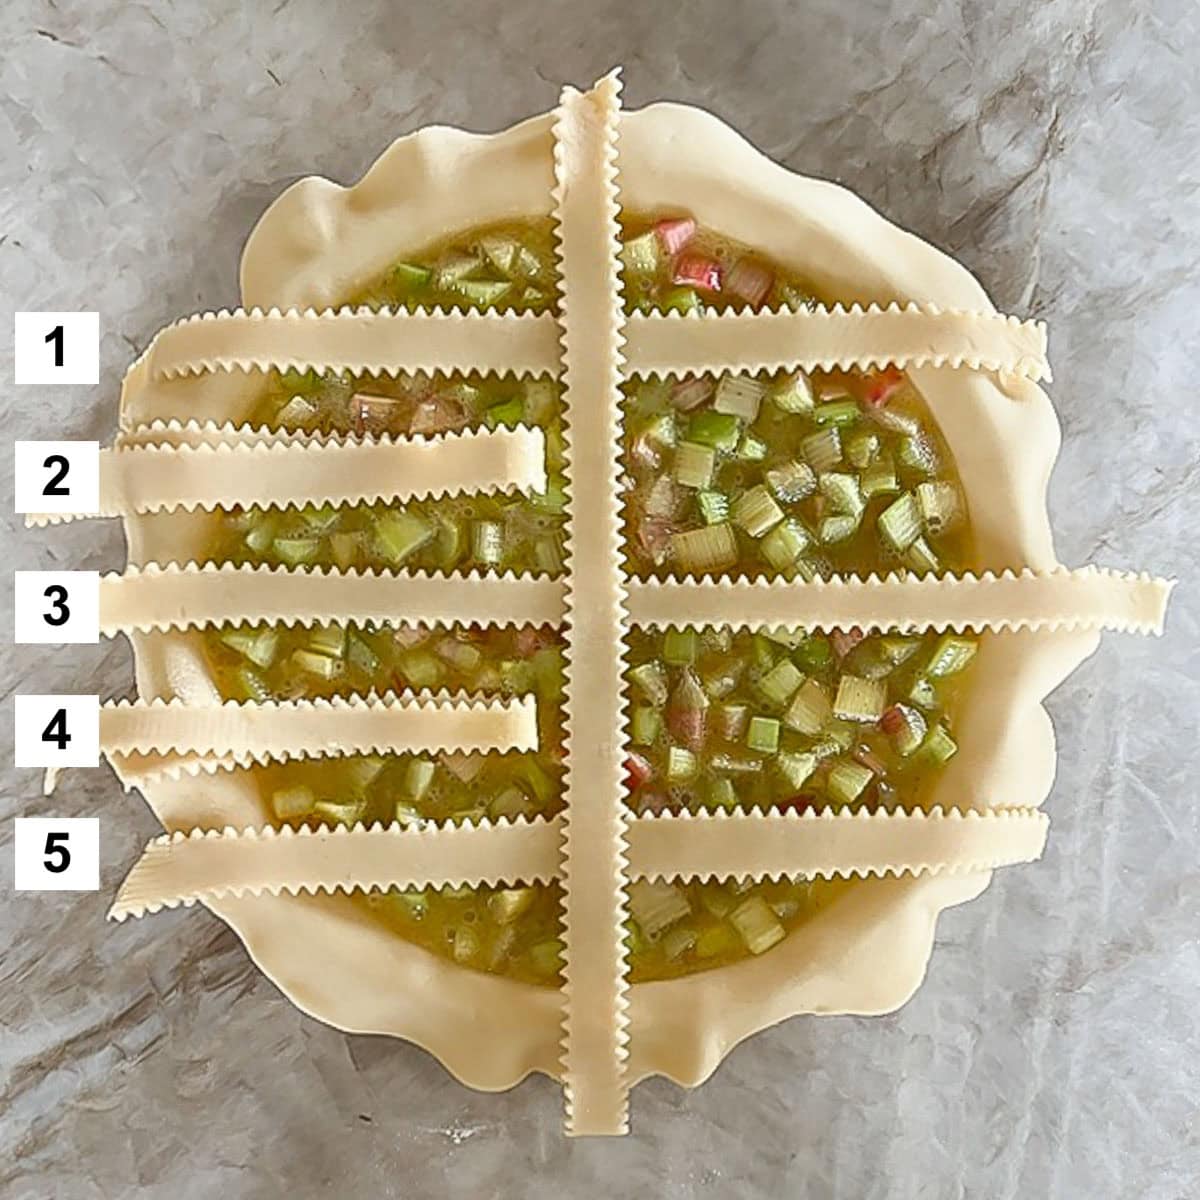
Remove lattice strips from the refrigerator. Position 5 strips of dough evenly spaced across the top of the pie filling, using every other strip you have cut. Place the longer strips, cut from the center, in the center of the pie, and the shorter strips on either side of the longest strip, so that the smallest strips are on the outside. - Fold back 2 strips; add one perpendicular.
Fold in half the 2nd and 4th strips. Place a long center strip of dough across the center of the pie, perpendicular to the strips you have already placed.
- Continue weaving.
Unfold the two strips previously folded back (#2 and #4) so they now overlap the central strip. Fold back strips 1, 3, and 5 and add a new cross strip about 3/4 inch from the first.
- Finish weaving.
Unfold strips 1, 3, and 5. Fold back strips 2 and 4; add another strip perpendicular. Continue, folding back alternate side strips as you weave the lattice strips to the edge of the pan, until the top of the pie is covered.
- Trim strips; fold over lower crust.
Whisk together the egg and water to make an “egg wash.” Brush egg wash on the edge of the pie, under the lattice ends. Trim any excess dough from the lattice ends as needed to the outer edges of the pie, making sure not to cut the lower crust. Fold the lower crust edge over the lattice ends and press to seal.
- Finish rim; brush top with egg wash.
Pinch the dough edge up into a raised rim – and flute if desired. Brush the top of your pie (the lattice pieces) with the egg wash. Now you’re ready to bake your pie!
Variation
You can put more strips on the top of the pie, to cover more of the top (you will have enough pie dough). You can even place the strips touching. I prefer to see the filling through the crust, so I only use 5 in each direction. Just follow the same weaving pattern, turning back every other strip.
Tips for a Perfect Woven Lattice Pie Crust
Here are some tips for making your lattice crust pie:
- Chill the dough. Ensure your dough is well-chilled before rolling and cutting. Cold dough is easier to work with and less likely to tear.
- Roll evenly. Roll out your dough to an even thickness. A rolling pin with guides can help you achieve a consistent thickness.
- Egg wash. Brush the lattice with a mixture of 1 egg whisked together with 1 tablespoon of water for a golden-brown finish.
- Don’t burn! Watch the pie closely, and if the top is browning too quickly, loosely tent the pie with foil without touching the crust if possible.
Make Ahead Options
You have two options for making your lattice pie crust ahead of when you plan to assemble and bake the pie:
- Freeze dough.
Prepare dough for 2 pie crusts but don’t roll; wrap individually in plastic wrap (or place in a freezer-safe zip top baggie) and freeze for up to 2 months. Thaw dough overnight in the refrigerator. - Alternatively, weave and freeze.
Prepare dough for 2 pie crusts, wrap one per the instructions above, and freeze. Weave the second crust, placing the woven crust on a piece of wax paper, on a cookie sheet. Once woven, place in the freezer and, once frozen, wrap well and return to freezer (I put it on a piece of cardboard to free up my cookie sheet). It will last for up to 2 months. Thaw woven crust overnight in the refrigerator.
FAQs for How to Lattice Pie Crust
It depends on your lattice pattern. I prefer all of the strips to be the same width, but you could cut them into two different widths, and alternate them as you weave for a more creative look.
Yes, you can use store-bought pie crust for a lattice pie. However, homemade pie crust tastes better and often holds up better when woven.
Lightly flour your rolling pin and work surface to prevent sticking. You can also use a silicone mat to roll out the dough.
Patch any torn strips with small pieces of dough.
Yes, you can add flavor to your lattice crust by incorporating herbs, spices, finely ground nuts, or cheese into the dough.

How to Make Lattice Pie Crust (Step-by-Step Guide)
Ingredients
- All-purpose flour
- 2 pie crusts, I recommend our Easy Flaky Pie Crust recipe, refrigerated for at least 30 minutes
- Pie filling of your choice for one pie, my favorite is mom’s Rhubarb Pie
- 1 egg
- 1 tablespoon water
Instructions
- On a lightly floured work surface, roll out the bottom crust dough to an even into a 12-inch circle. Transfer to a 9-inch pie plate. Trim the pastry edge to around a 3/4-inch overhang. Poke the bottom of the crust with a fork in several places. Refrigerate for at least 30 minutes.
- After 30 minutes, remove the bottom crust from the refrigerator and spoon in the prepared filling.
- Roll dough for the top crust into a 12-inch circle. Use a pastry wheel (fluted or straight edge) or a large sharp knife to cut the dough into 1/2 to 1-inch wide strips; place strips on a large cookie sheet, side by side. Refrigerate for at least 30 minutes.
- Remove lattice strips from the refrigerator. Position 5 dough strips evenly spaced across the top of the pie filling, using every other strip you have cut. Place the longest strips, cut from the center, in the center of the pie, and the shorter strips on either side of the longest strip, so that the smallest strips are on the outside.
- Fold in half the 2nd and 4th strips. Select a long center strip from the remaining strips; place it across the center of the pie at right angles to the strips you have placed on the pie.
- Unfold the two strips previously folded back (#2 and #4) so they now overlap the central strip. Fold back strips 1, 3, and 5 and add a second cross strip about 3/4 inch from the first. Unfold strips.
- Continue, folding back alternate side strips as you weave the lattice strips to the edge of the pan.
- Whisk together the egg and water to make an “egg wash.” Brush egg wash on the rim of the lower crust, under the lattice ends. Cut the lattice ends as needed to the outer edge of the pan, making sure not to cut the lower crust. Fold the lower crust edge over the lattice ends and press to seal.
- Pinch the dough edge up into a raised rim – and flute if desired.
- Brush the lattice top pieces with the egg wash.
Notes
Nutrition
Nutrition information is automatically calculated, so should only be used as an approximation.
Note: This tutorial was originally shared in April of 2010 and updated in November of 2024, adding in more detail and photos!


